Wifi Shield Programming Tutorial
Overview
The easiest way to update your OpenBCI Wifi Shield Firmware is Over-The-Air (OTA). You can also update firmware through a direct connection to the serial port on the WiFi Shield itself. For the wired programming, you can use the USB dongle that comes with the Cyton as a pass through or you can use a standard FTDI UART to USB Breakout board.
Program WiFi Shield Over The Air
Use Any Web Browser
Pick your default web browser

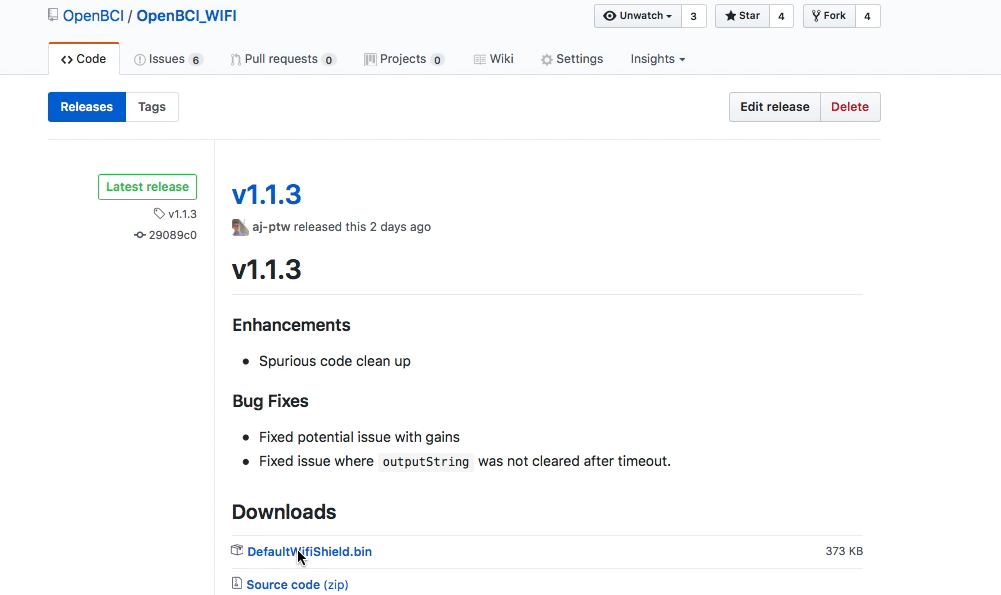
Download the WiFi Shield Firmware
First, download the file called DefaultWifiShield.bin from the latest release OpenBCI_WiFi Github repository.
Save to your downloads folder.
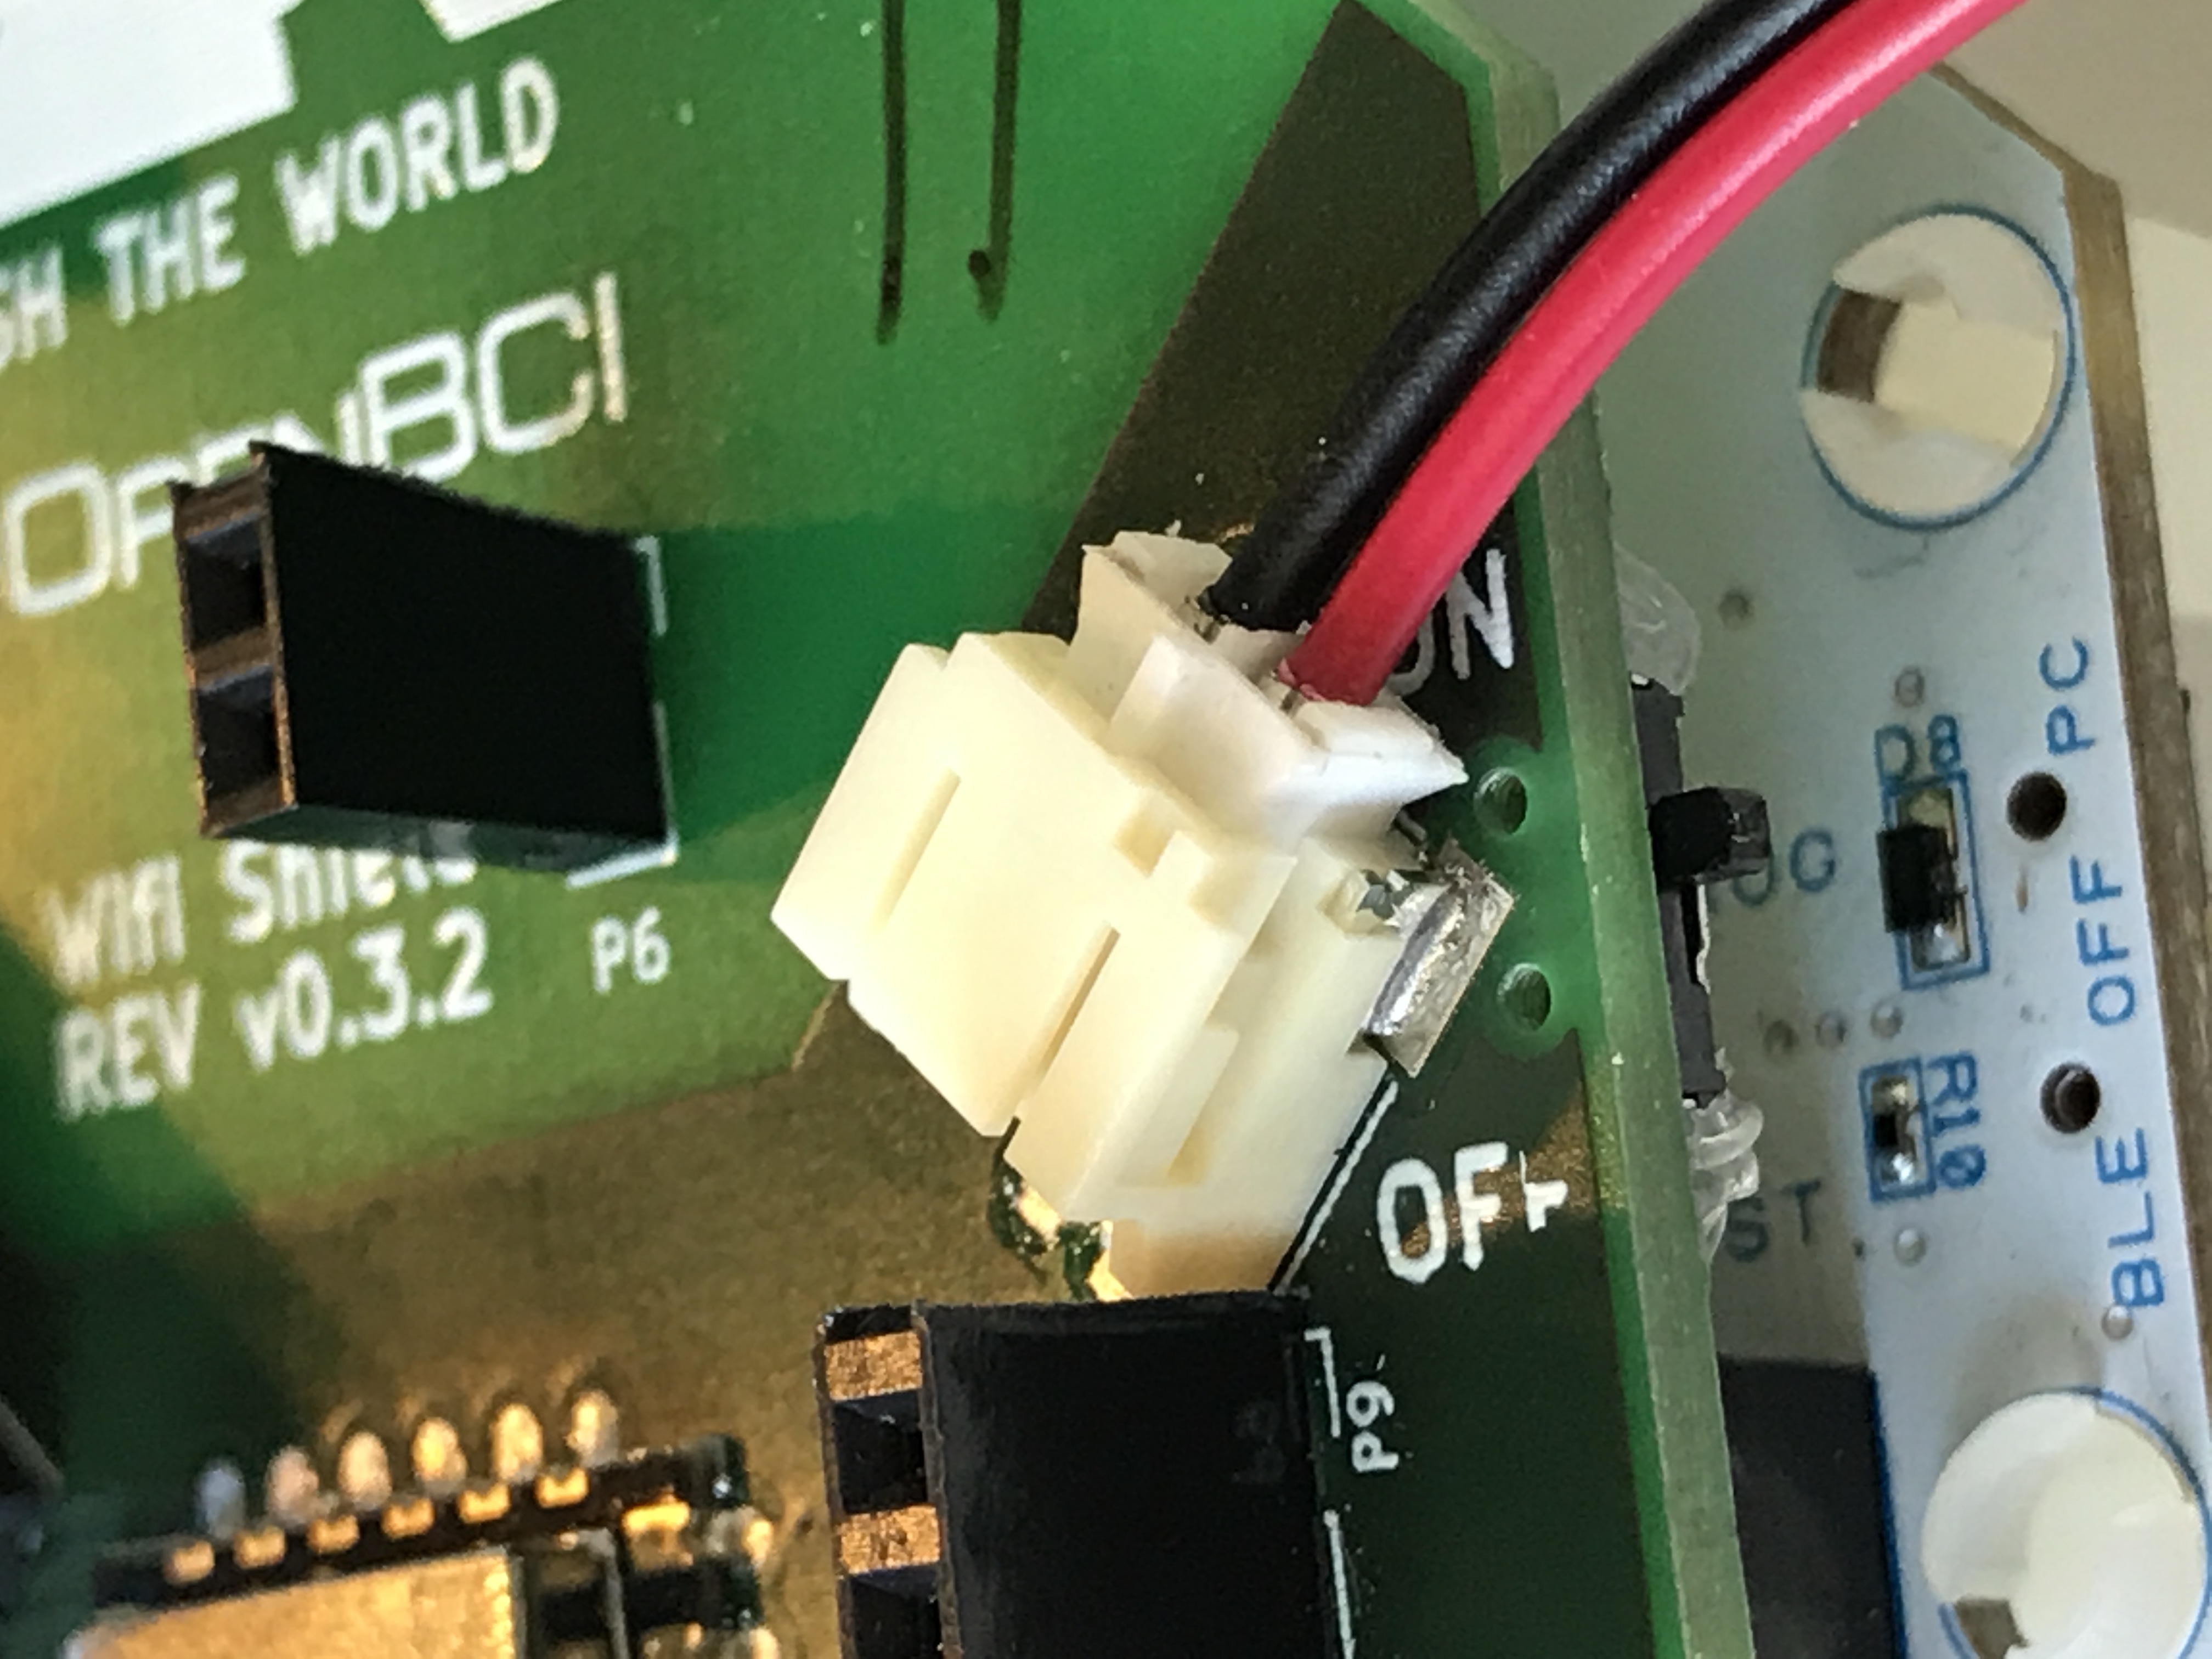
Isolate and Power WiFi Shield
Next remove your wifi shield from the Cyton or Ganglion if it's not already.
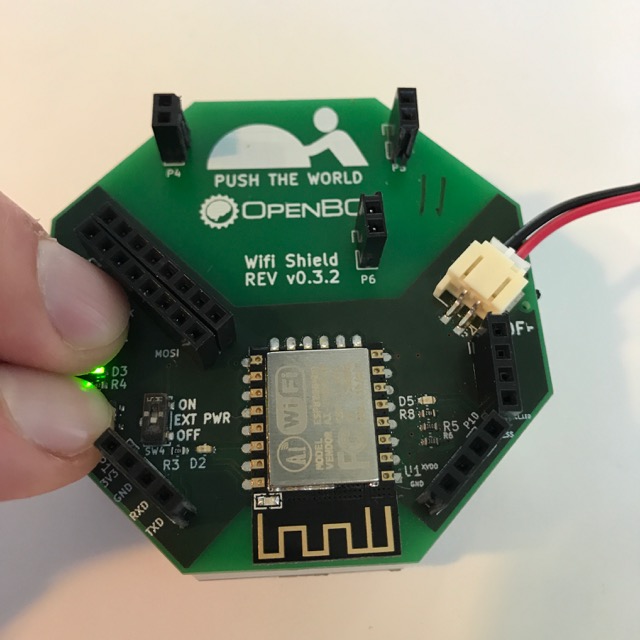
Plug a battery into the WiFi Shield and power the Shield by turning the power switch to the ON position.
Get WiFi Shield on Your Wireless Network
Then get your WiFi Shield on your local wireless network if it's not already.
Get Address of WiFi Shield
Find the IP Address of your WiFi Shield by clicking the > button in the WiFi section of the Control Panel, and then clicking the IP Address button, as shown in the image below:
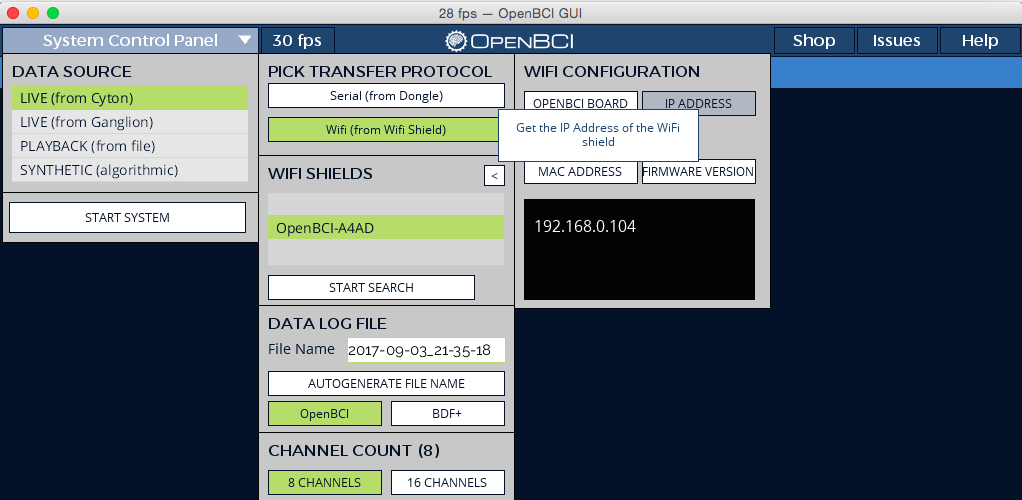
If you're having issues with that step, here's a more in-depth tutorial on using the OpenBCI_GUI to get your shields ip address.
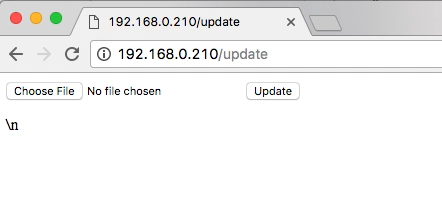
Go to /update Page of WiFi Shield
Navigate to http://192.168.0.XXX/update where 192.168.0.XXX is the IP Address of your WiFi Shield found in the step above.
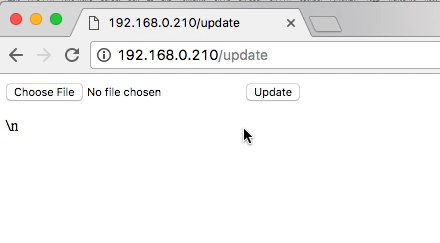
On Mac, you may use your shields unique name instead of the ip address; i.e. http://OpenBCI-2F0E.local/update where 2F0E is your devices unique identifier. Either option works on Mac.
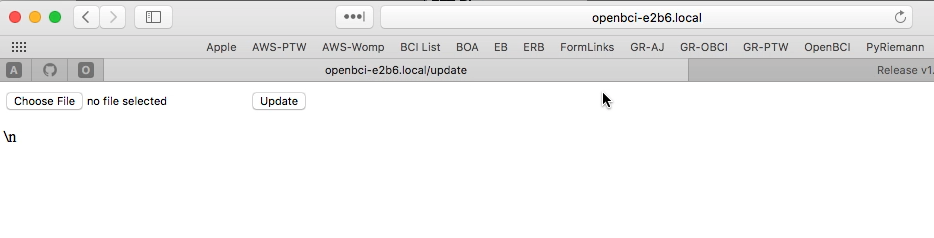
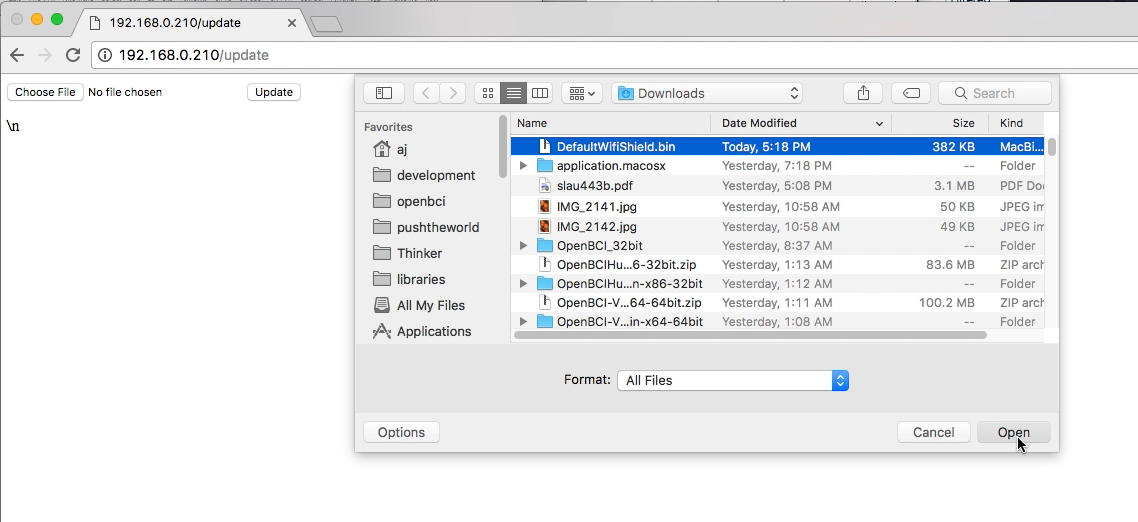
Select Binary File to Upload
Now select the Choose File button and from the drop down selected the DefaultWifiShield.bin which you downloaded earlier
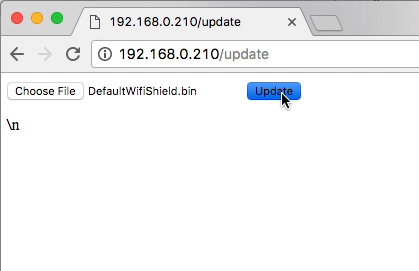
Update the Firmware
Then select Update to start the update process
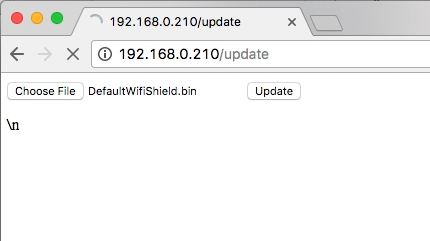
The page will hang for about 10-15 seconds, this the firmware being uploaded.
Then you will see a success message appear, your WiFi Shield is now rebooting, please continue to wait for about 30 seconds.
Note: on some browsers, the page will not automatically refresh. If you've waited more than 30 seconds for the success message to appear, skip to the next step and see if it works. If it doesn't try the above step again.

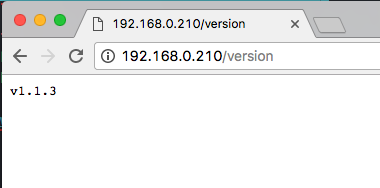
Verify New Version Number
Once your web browser refreshes itself and the update page is displayed again, you may navigate to the version page and verify your wifi firmware version matches the version you downloaded. If the version is not correct, then be sure you removed your WiFi Shield from a Cyton or Ganglion and try again.
Hardware for Wired upload
Program OpenBCI Wifi with FTDI Boards
There are many, many FTDI chip breakouts and cables out there that you can use. Here are a couple examples of popular devices.
FTDI Friend
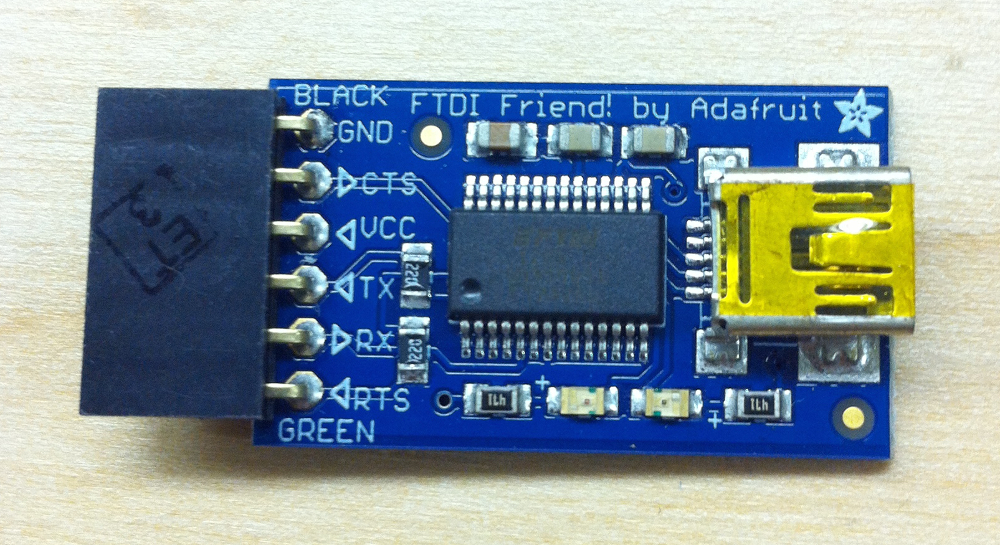
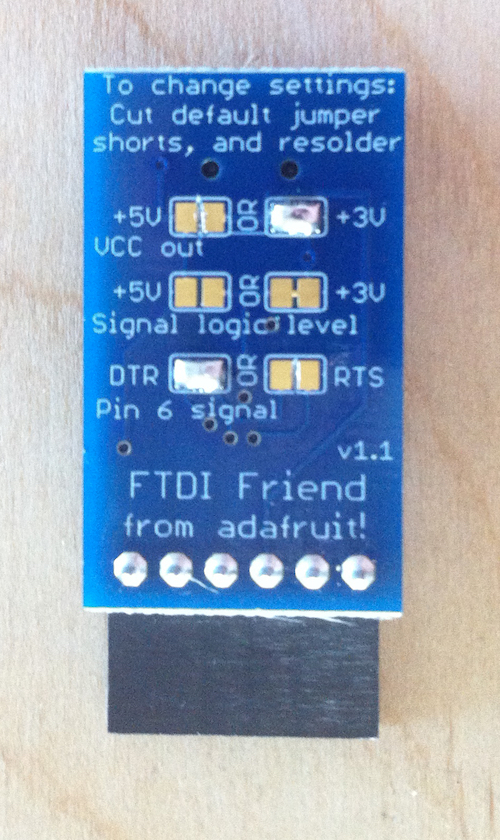
Another example would be the FTDI Friend from Adafruit. I cut the trace on the RTS and 5V pads as well. These are the correct settings for uploading to ESP8266 using FTDI Friend. These breakouts are awesome and how the board was developed.
FTDI Basic Breakout
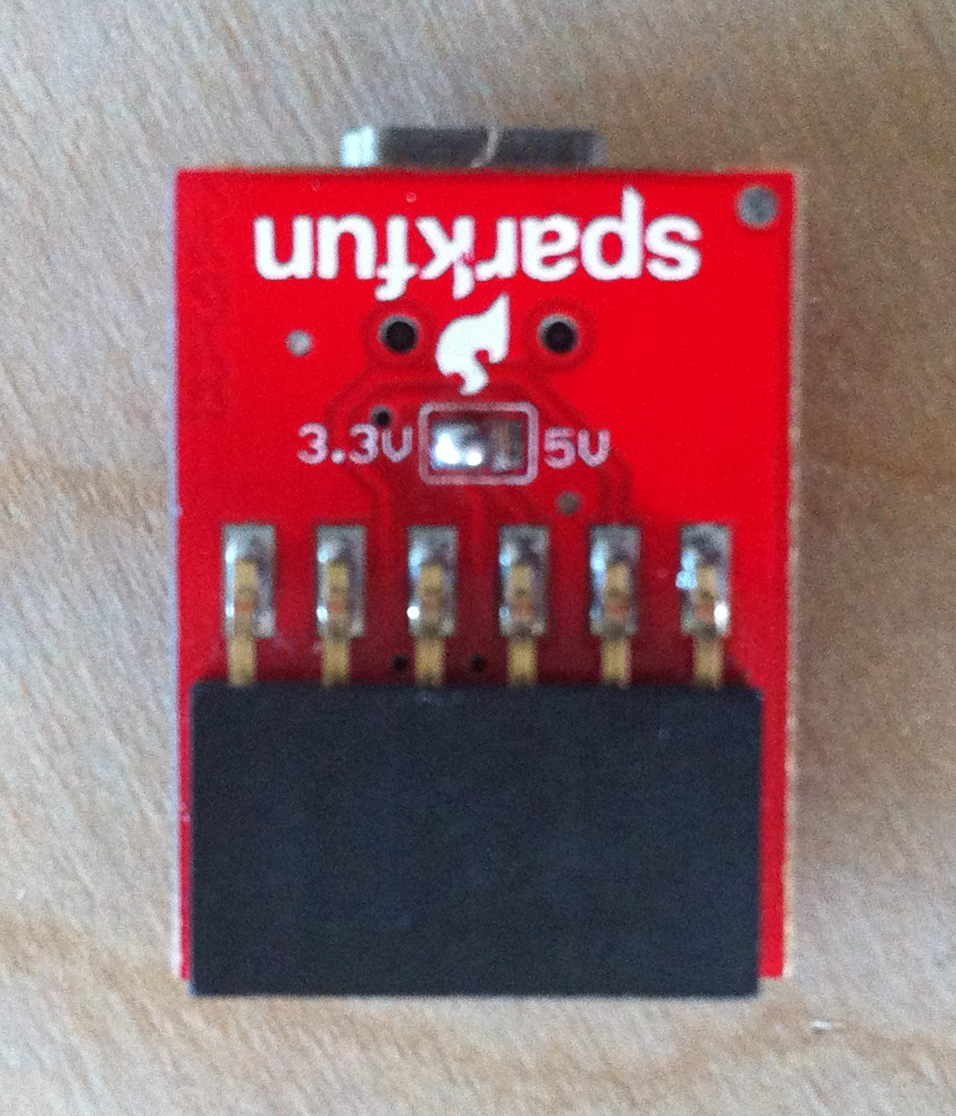
Sparkfun makes an FTDI breakout as well, and they come in a couple of flavors. 5V and 3V. By now, you know that you want the 3V Version. [pic coming soon] Also, if you have a version of this board with a voltage selection on the back, make sure that it has the 3.3V pads connected and the 5V pads cut!
OpenBCI Cyton Dongle
The OpenBCI Dongle can be used to upload firmware to ESP8266. See the section on how to pass through the code in the Cyton Radio Programming Guide.
Download Compiled Binary for Upload
Install Python Dependency
You will need either Python 2.7 or Python 3.4 or newer installed on your system.
Download and Install esptool
The latest stable esptool.py release can be installed from pypi via pip:
$ pip install esptool
With some Python installations this may not work and you'll receive an error, try python -m pip install esptool or pip2 install esptool.
After installing, you will have esptool.py installed into the default Python executables directory and you should be able to run it with the command esptool.py.
In Windows, we use Command Prompt.
Download the WiFi Shield Firmware
First, download the file called DefaultWifiShield.bin from the latest release OpenBCI_WiFi Github repository.
Save to your downloads folder.
Get the Serial Port of Programmer
The correct serial port for your OpenBCI Dongle or FTDI friend will be
* On Macs, this will be named **/dev/tty.usbserial-DN00nnnn** where the nnnn is a combination of numbers and letters specific to your programmer of choice.

* On Windows, the serial port will be listed as a numbered COM port.

* On Linux, it will be different.
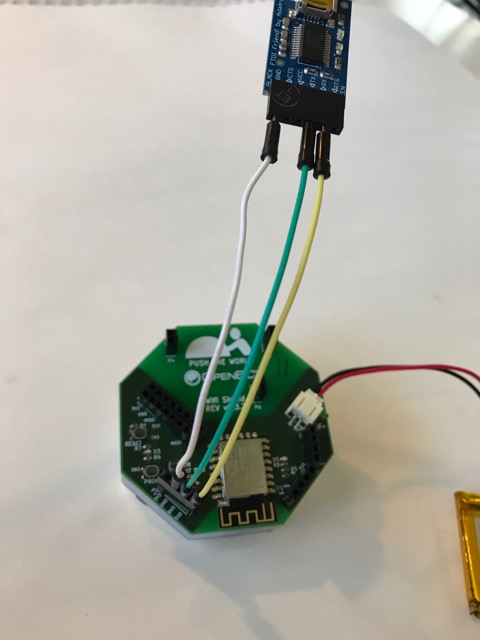
Connect WiFi Shield to Programmer
Hook up the FTDI friend, OpenBCI Dongle, or other UART-USB programmer to the Wifi Shield. Don't power the Wifi shield through the FTDI friend.
| FTDI_Friend | Wifi Shield |
|---|---|
| GND | GND |
| RX | TX |
| TX | RX |
Isolate and Power WiFi Shield
Next, remove your wifi shield from the Cyton or Ganglion if it's not already.
Remove your Wifi Shield from the Cyton/Ganglion board. Always use a spudger to remove your WiFi Shield from a Cyton or Ganglion.

Plug a battery into the WiFi Shield and power the Shield by turning the power switch to the ON position.
Plug in battery to the WiFi Shield.
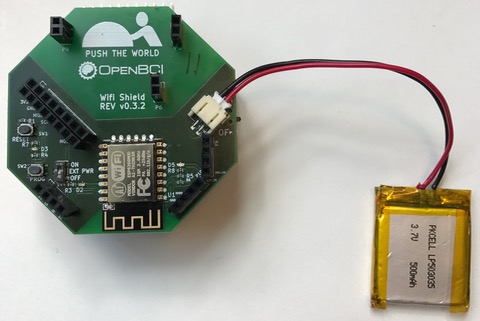
Next, power the Wifi shield.
Put WiFi Shield in Bootloader Mode
Press and hold the PROG button.
Press and release the RESET button while holding PROG.
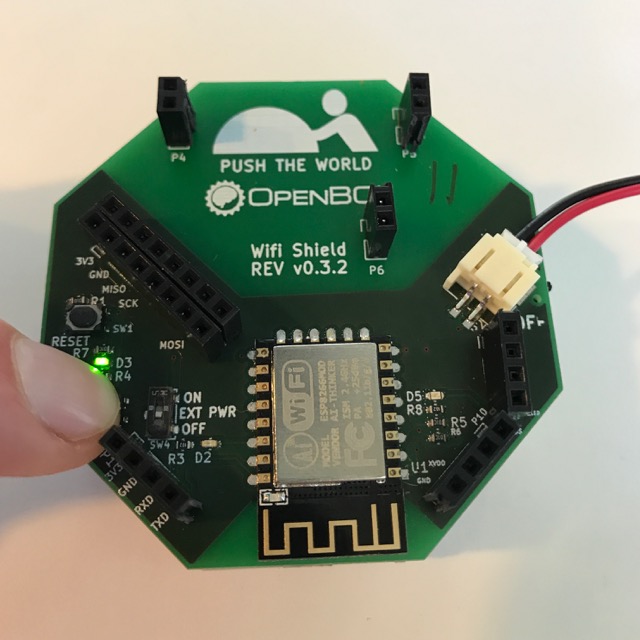
Finally, release the PROG button.
You should see no lights on the WiFi Shield if it is in bootloading mode.
Upload Code
On Mac/Linux
From terminal you installed esptool.py to earlier, substitute your serial port name for YOURPORT in the command below.
$ esptool.py --port /dev/tty.usbserial-YOURPORT write_flash 0x000000 ~/Downloads/DefaultWifiShield.bin
On Windows
From Command Prompt you installed esptool.py to earlier, substitute your serial port name for COM4 in the command below.
$ esptool.py --port COM4 write_flash 0x000000 Downloads\DefaultWifiShield.bin
Compile Source Code to build binary
Prerequisites to Compile Source Code
You will need:
- Computer (Windows or Mac or Other)
- Arduino IDE Version 1.8.3
- OpenBCI WiFi Shield
You will need:
- Computer running Arduino v1.8.0 or later
- ESP8266 libraries with SPISlave
- OpenBCI Dongle or FTDI USB to UART (friend) connected to USB port
- OpenBCI WiFi Shield with battery power
- OpenBCI WiFi Firmware (follow guide below to download)
- Various other WiFi Dependencies
- OpenBCI Cyton SD Firmware (follow guide below to download)
- OpenBCI WiFi Master Firmware (follow guide below to download)
Download Latest Arduino
- If your computer does not have Arduino v1.8.0 (or later), install the latest Arduino IDE which can be found here:
Install Firmware From Arduino Library Manager (easiest!)
Don't know what the Library Manager is? Skim over the Official Arduino Guide.
Open the Library Manager and then
Search for OpenBCI and install the latest version for
OpenBCI_Wifi.Search for WiFiManager and install the latest version for
WiFiManager.Search for ArduinoJson and install the latest version for
ArduinoJson.Search for PubSubClient and install the latest version for
PubSubClient.Search for Time and install the latest version for
Timev1.5.0by Michael Margolis, you will need to scroll down to theTsection.Search for ntp and install the latest version for
NtpClientLib(NOTNtpClient).Use the Library Manager to search for and install:
Manual Installation of Ganglion Firmware (harder)
Download the latest zips for the following libraries:
Unzip the folders and change the names to:
- OpenBCI_Wifi
- WiFiManager
- ArduinoJson
- PubSubClient
- Time
- NtpClientLib
- Move all folders to:
On Mac: /Documents/Arduino/libraries
On Windows: C:\Users\username\Documents\Arduino\libraries
If you don't have a libraries folder there, go ahead and make one.
If you're have trouble or want to learn more checkout the Official Arduino Guide for manual installation.
Clone The Repo From Github
Developers looking to contribute or write custom firmware can clone the firmware repositories directly to your libraries folder.
On Mac: `/Documents/Arduino/libraries`
On Windows: `C:\Users\username\Documents\Arduino\libraries`
Install ESP8266 Core Firmware
Follow the instructions for downloading the Arduino ESP8266 core from Boards Manager. The SPISlave.h is newly added to the official SDK. NOTE: Per a comment in the forums: "the GUI only works if the binary is compiled using Arduino ESP library version 2.5.0".
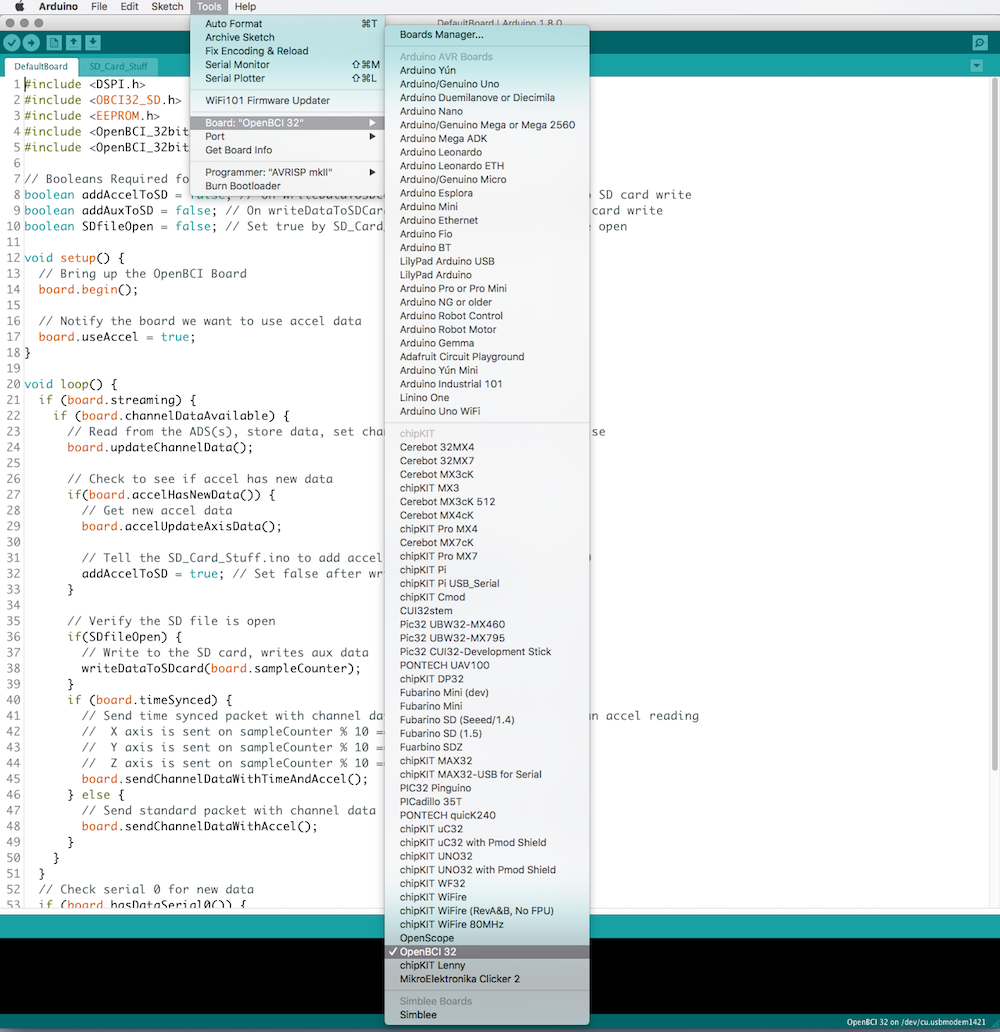
Select 'Adafruit Huzzah ESP8266 as Board
If you followed the process in the previous link, and you will be able to from Tools->Board select Adafruit Huzzah ESP8266 from the ESP8266 Modules subsection. Then, select from Tools->Flash Size, 4M (1M SPIFFS).
Select DefaultWifiShield.ino from Examples
In the Arduino IDE go to Files-->Examples-->OpenBCI_Wifi-->DefaultWifiShield which will launch the default Wifi Shield firmware. NOTE You must upload ONLY the DefaultWifiShield Sketch!
Compile Source Code with Arduino
Restart your Arduino if you just installed all of the dependencies. Select Verify from the menu bar Sketch-->Verify/Compile.
Compile Source Code with make
While developing this firmware, we found it much better to use makeESPArduino which is a command line tool for building and compiling the firmware without having to use the Arduino IDE! Use the makeESPWifiDefault.mk file in the WiFi's github repo.
Get the Serial Port of Programmer
The correct serial port for your OpenBCI Dongle or FTDI friend will be
* On Macs, this will be named **/dev/tty.usbserial-DN00nnnn** where the nnnn is a combination of numbers and letters specific to your programmer of choice.

* On Windows, the serial port will be listed as a numbered COM port.

* On Linux, it will be different.
Connect WiFi Shield to Programmer
Hook up the FTDI friend, OpenBCI Dongle, or other UART-USB programmer to the Wifi Shield. Don't power the Wifi shield through the FTDI friend.
| FTDI_Friend | Wifi Shield |
|---|---|
| GND | GND |
| RX | TX |
| TX | RX |
Isolate and Power WiFi Shield
Next remove your wifi shield from the Cyton or Ganglion if it's not already.
Remove your Wifi Shield from the Cyton/Ganglion board. Always use a spudger to remove your WiFi Shield from a Cyton or Ganglion.
Plug a battery into the WiFi Shield and power the Shield by turning the power switch to the ON position.
Plug in battery to the wifi shield
Second power the Wifi shield
Put WiFi Shield in Bootloader Mode
Press and hold the PROG button.
Press and release the RESET button while holding PROG.
Finally, release the PROG button.
You should see no lights on the WiFi Shield if it is in bootloading mode.
Upload the code
Now press upload in the Arduino IDE or execute the make -f makeESPDefault.mk flash to upload to the shield.