WiFi Shield Getting Started Guide (Deprecated)
Overview
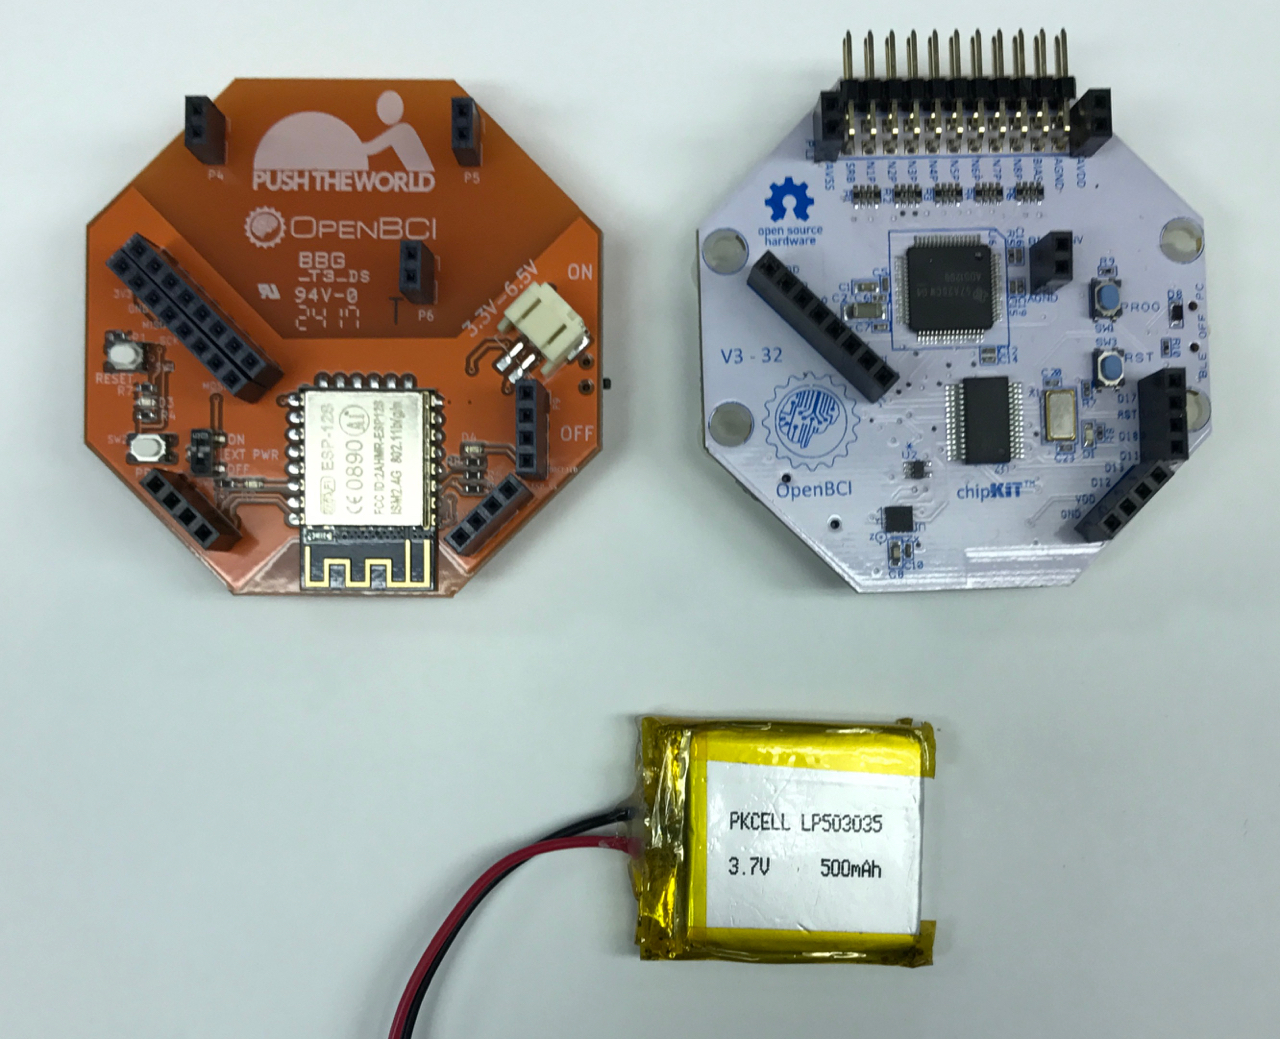
The OpenBCI WiFi Shield is a hardware product, intended to work with the OpenBCI GUI software and be paired with any OpenBCI board, that enables biodata streaming over wifi. The advantage of wifi over bluetooth is increased sampling rate. The WiFi Shield increases the sample rate by transmitting the data via WiFi as opposed to Bluetooth. The WiFi Shield can be controlled through HTTP requests and can send JSON objects with data in nano volts. With the WiFi Shield connected:
The Cyton can stream data at 50Hz, 500Hz, 1000Hz, 2000Hz, 4000Hz, 8000Hz and 16000Hz.
The Cyton + Daisy can stream data at 250Hz, 500Hz, 1000Hz, 2000Hz, 4000Hz, and 8000Hz.
The Ganglion can stream data at 200Hz, 400Hz, 800Hz, 1600Hz, 3200Hz, 6400Hz, and 12800Hz
IMPORTANT NOTE: This product is in beta mode. The WiFi shield is known to have reliability issues (packet loss and cyclical noise spikes) when used with Cyton and CytonDaisy boards. Using it effectively requires advanced technical skills and programming knowledge. Please proceed at your own risk. OpenBCI cannot guarantee that the device will work with your configuration.
When connecting to Cyton+WiFi or Cyton+Daisy+WiFi using the OpenBCI GUI, you have the option of using TCP, UDP, or UDPx3. We recommend trying to connect using UDPx3 protocol.
Prerequisites
The WiFi Shield requires your Cyton to run the latest Cyton firmware and your Ganglion to the latest Ganglion firmware firmware. PLEASE NOTE IF YOU PURCHASED YOUR OPENBCI BOARD MID-2018 OR LATER, YOU DO NOT NEED TO UPDATE ITS FIRMWARE.
This guide will walk you through setting up your WiFi Shield, connecting it to your computer, and then connecting it to yourself. The first tutorial is for the Cyton and the second is for the Ganglion.
When setting up the WiFi Shield to connect to a local network or hotspot, the WiFi needs to be powered independently. Please make sure the WiFi shield is unplugged from a Ganglion or Cyton during setup, otherwise it may not work.
Cyton with WiFi Shield
Expand this section for Cyton + WiFi Shield instructions
What you need
- OpenBCI WiFi Shield
- OpenBCI Cyton Board
- One LiPo battery or 6V AA battery pack & (x4) AA batteries (batteries not included)
- You only need one battery when using the Cyton with the WiFi Shield. The Cyton takes power from the WiFi Shield. When the Cyton is powered by the WiFi Shield, you'll find the power switch on the Cyton becomes useless.
General Overview
In general the steps are:
- Power off WiFi Shield and Cyton
- Seat WiFi Shield on Cyton
- Put
EXT PWRswitch on the WiFi Shield toON - Plug battery into WiFi Shield only (do not plug a battery into the Cyton)
- Main power switch on WiFi Shield to
ON
Powering the Shield
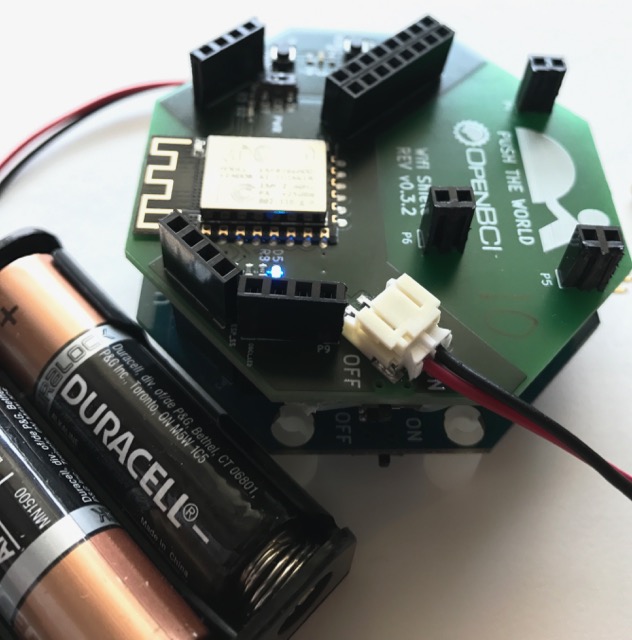
Install 4 AA batteries in your battery pack or charge up your LiPo battery. The Wifi shield has a larger power draw than the Bluetooth communication system so we recommend using LiPo battery packs. The Cyton is not able to supply enough current to power the power-hungry wifi shield, so we put a bigger voltage regulator on the shield to power both the Wifi chip and pass the Cyton components.
IMPORTANT! Keep the dip switch labeled EXT PWR to ON when using Cyton.
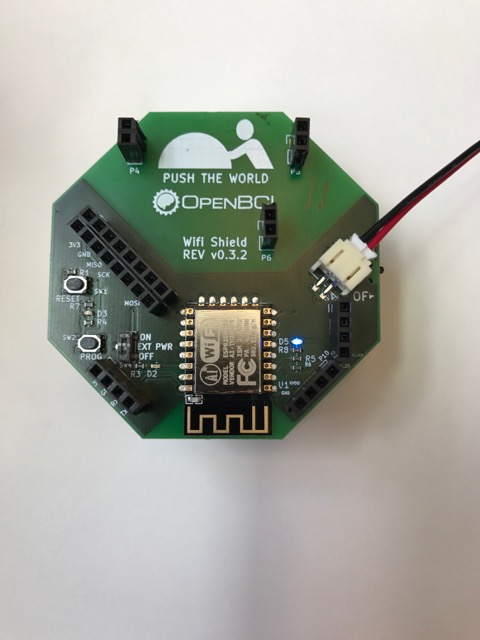
The Wifi Shield and the Cyton board use only one battery by means of the JST connector on the Wifi shield. The pass through LED (the right most LED) on the wifi shield will show the solid blue LED from the Cyton below.
NOTE ABOUT ANALOG/AUX MODE
When switching the board mode to analog/aux, the D4 light turns off. This can be done in the OpenBCI GUI, or running this in python:
      from openbci import wifi as bci
      shield = bci.OpenBCIWiFi(ip_address = '192.168.1.141', log=True, high_speed=True)
      shield.wifi_write('/2') #analog mode
Observe that light D4 turns off. This is normal. In order for the LED to turn on the Cyton has to set that pin as an output HIGH. When the Cyton switches into digital/analog inputs it changes the pin driving the D4 LED to INPUT, so the is no longer receiving any current to turn on.
Ganglion with WiFi Shield

Expand this section for Ganglion + WiFi Shield instructions
What you need
- OpenBCI WiFi Shield
- OpenBCI Ganglion Board
- Two batteries, 3.7V or 4.2V LiPo or 6V AA battery will work (batteries not included)
General Overview
In general the steps are:
- Power off WiFi Shield and Ganglion
- Seat WiFi Shield on Ganglion
- Put
EXT PWRswitch on Shield toOFF - Plug battery into Ganglion
- Plug battery into WiFi Shield
- Main power switch on WiFi Shield to
ON - Main power switch on Ganglion to
ON
Powering the Shield
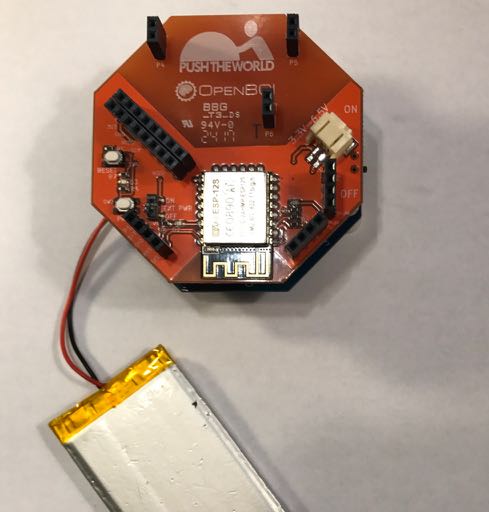
The Ganglion runs at 3.0 Volts while the WiFi Shield runs at 3.3 Volts. You can use the WiFi shield to power the Ganglion; using the Ganglion to power the WiFi Shield is not recommended. Install 4 AA batteries into your battery packs or charge up your LiPo batteries. The Wifi shield draws more current than the Ganglion so we recommend using LiPo rechargeable batteries to power the Wifi Shield.
To use one battery, flip EXT PWR in the ON position. You can use the black spudger tool that came with your WiFi Shield.
To use two batteries, keep EXT PWR in the OFF position, or flip it to OFF in case it is ON.
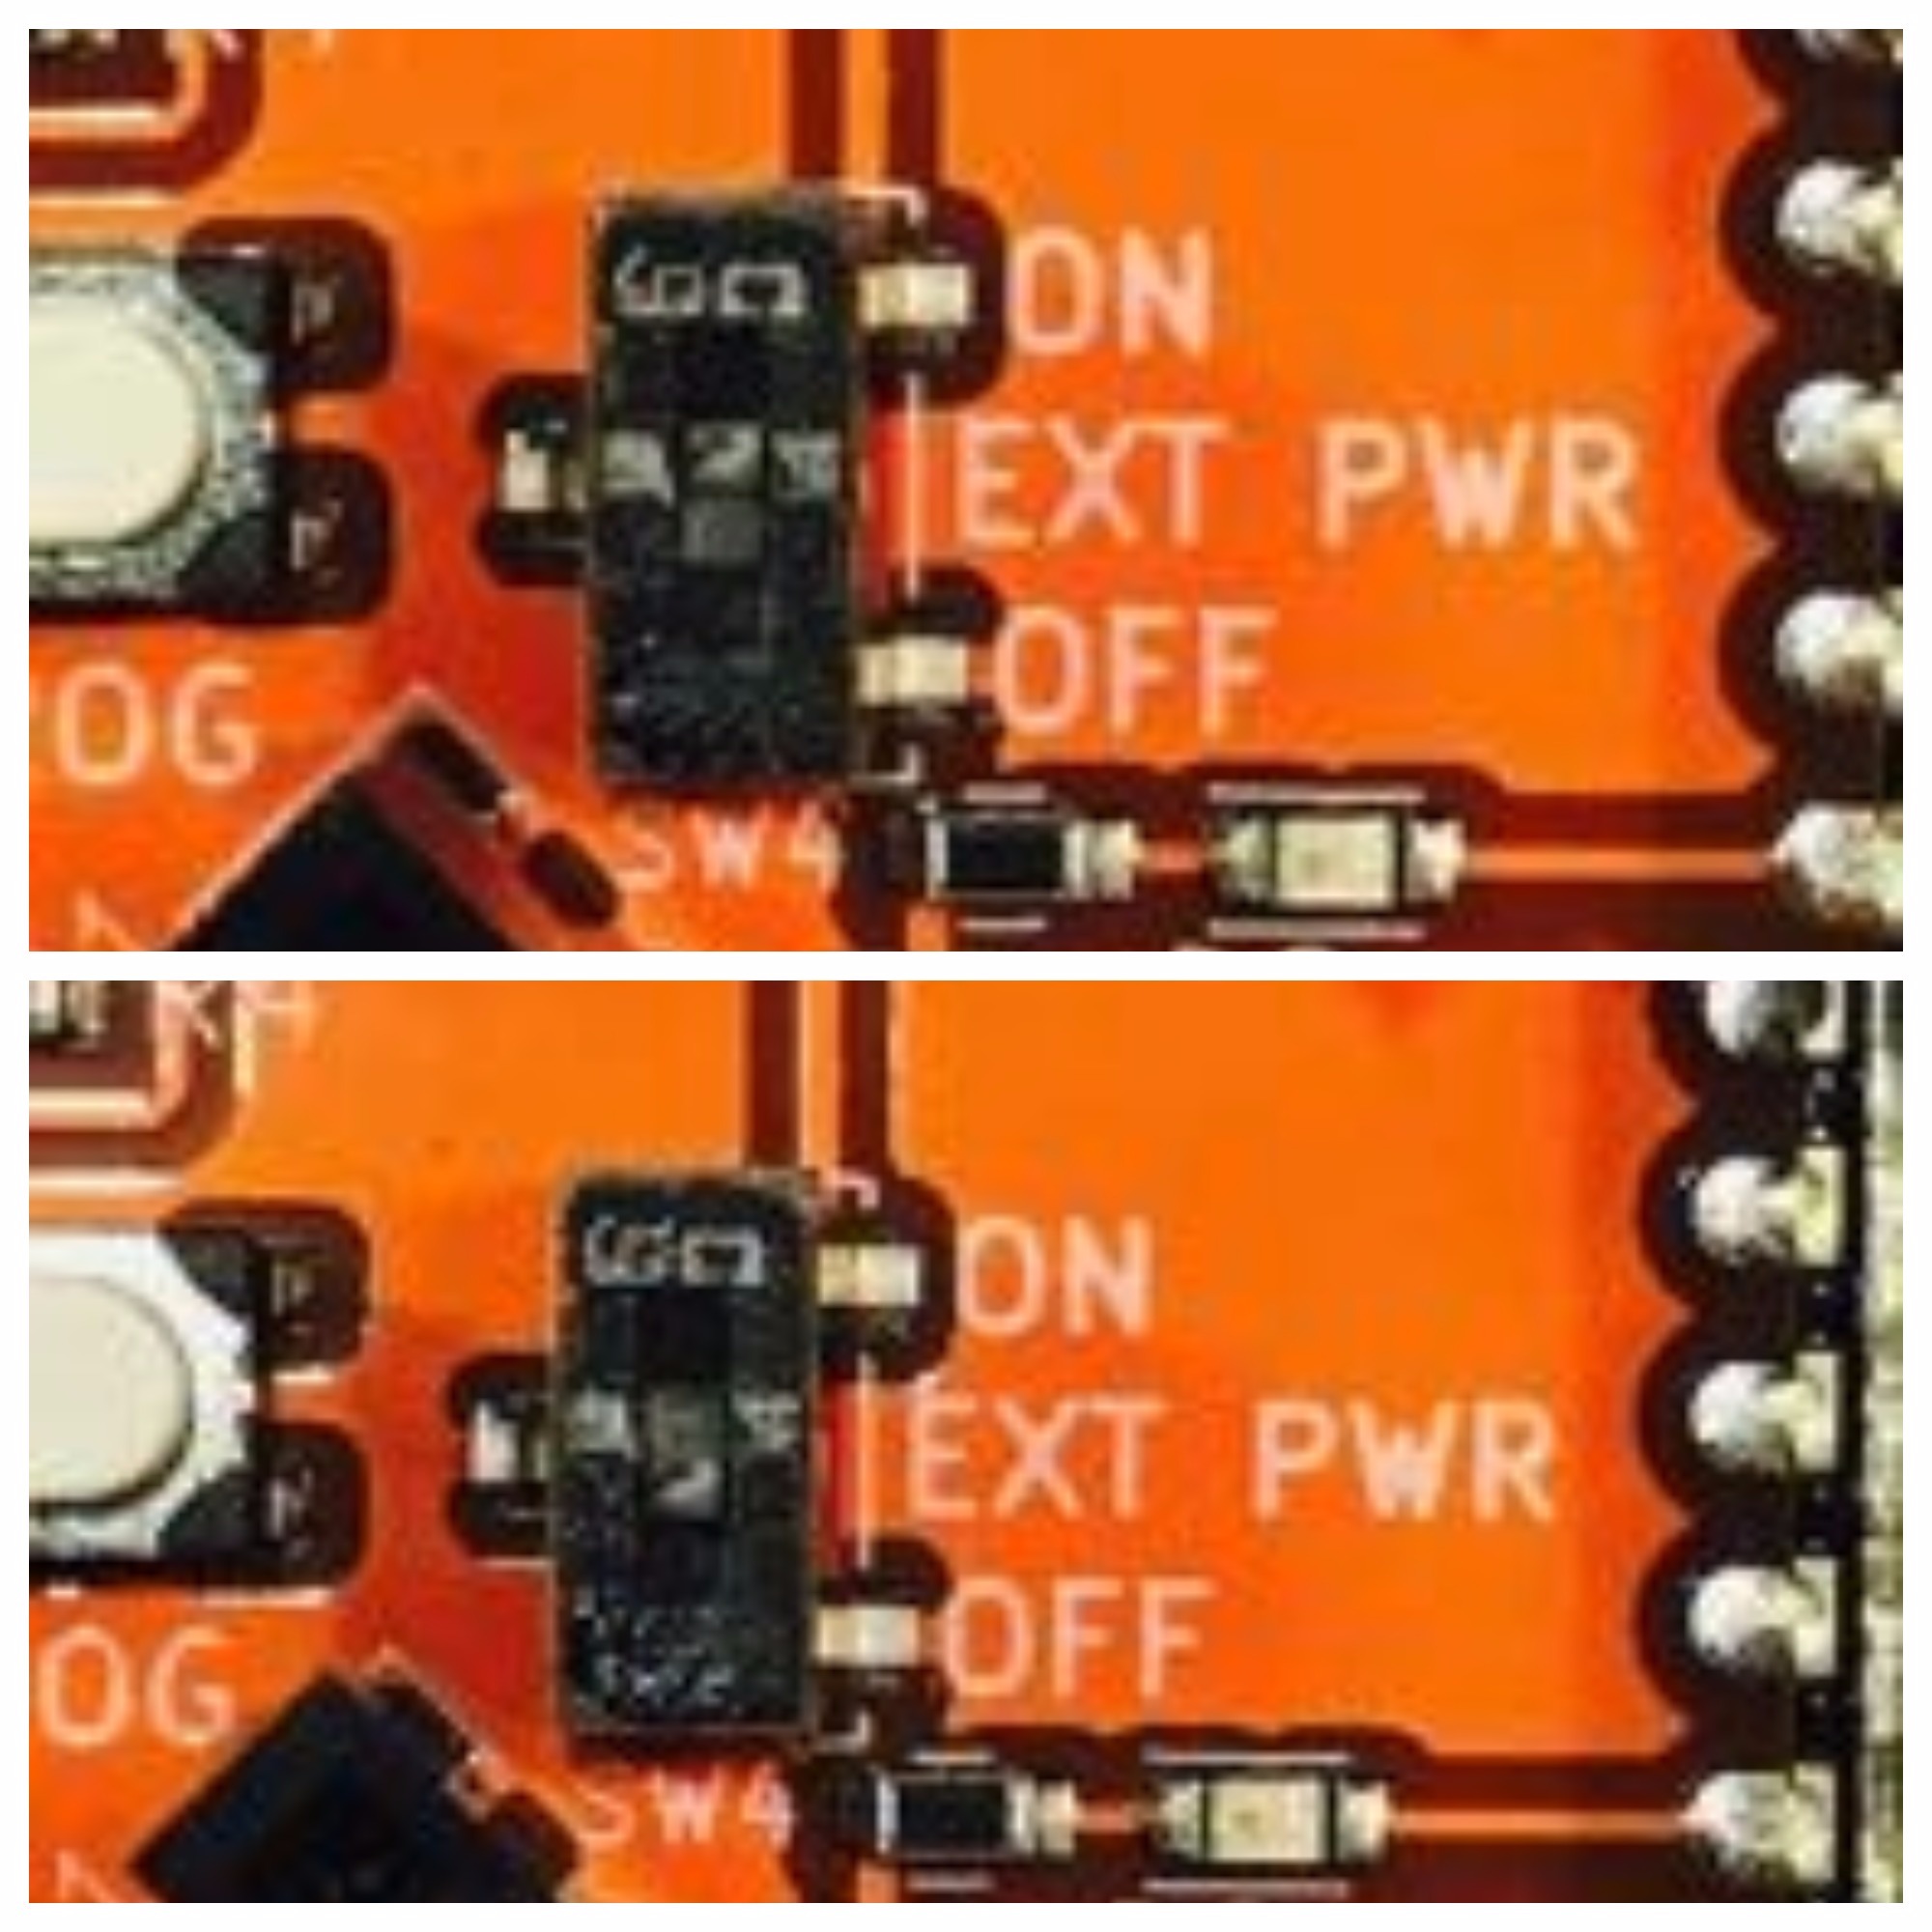
EXT PWR is ON in top photo, OFF in bottom photo.
With two batteries, always power the WiFi Shield before the Ganglion.
WiFi Configuration for Firmware 2.0 and later
WiFi Shields got powerful in firmware 2.0.0, we learned a lot and iterated continuously, we love the new features on the WiFi Shield, by "we" meaning a worldwide community of empowered hackers and researchers alike.
WiFi Shield Mode of Operations
There are two modes primary modes of operation for the WiFi Shield, WiFi Station and WiFi Direct. The D2 LED status light is used to indicate what mode of operation the WiFi Shield is in at start up.
WiFi Station
WiFi Station shipped as the only option with v1.3.0 firmware. WiFi Station mode connects your WiFi Shield to a WiFi Router, such as your home wireless network that you watch Netflix on... The WiFi Shield uses 802.1 b/g/n and sends a lot of data, especially as we increase data rates and number of channels, slow or far routers can result in data loss. We introduced UDP and UDP burst mode in firmware 2.0.0 that we hear runs great.
WiFi Station is not a realistic mode of operation when you are at a conference, hack-a-thon, universities with enterprise level security, doing a live demo, etc... The community pushed hard and introduced WiFi Direct mode of operation.
WiFi Direct
WiFi Direct bypasses a WiFi router by having your computer or phone connect directly to a wireless network broadcasted by the WiFi Shield. The WiFi Direct mode allows for high speed data streaming, such as 1000Hz with 16 channels with zero compression, these speeds and data throughputs are digested easily in this peer to peer WiFi data transfer mode.
Status D2 LED Indicator
If your D2 LED Indicator light stays solid on at start-up, it's highly recommended you follow the tutorial for , you must update your firmware with an over the air update to 2.0.0 or later.
If the WiFI Shield is not able to join a wireless network, such as when the saved wireless network is not in range or the WiFi shield has no credentials saved in memory, the WiFi will be in WiFi Direct mode. The D2 LED indicator will blink 10 times in 2 seconds to indicate the WiFi Shield is in WiFi Direct mode.
If there are saved wireless network credentials on the WiFi Shield, the WiFi Shield will blink 4 times in 2 seconds to indicate the WiFi Shield is searching for the stored wireless network. If the stored network is found, the WiFi Shield will join the wireless network and blink 2 times in 2 seconds; the WiFi Shield is now in WiFi Station mode. If the stored network is not found within 10 seconds, the WiFi Shield will switch into WiFi Direct mode.
The WiFi Manager, the tool used to store wireless network credentials onto the WiFi shield, may be launched in either WiFi Client mode or WiFi Direct mode.
Important Notes
- To update a WiFi Shield's firmware it cannot be under control of an OpenBCI Board (Cyton or Ganglion). The WiFi needs to be powered independently, with Ganglion, WiFi Shield shall be disconnected, with Cyton, the
EXT PWRshall be in the off position. Why? So the WiFi Shield can effectively power cycle. - If you have trouble joining the WiFi Shield network, turn the WiFi of your phone/computer/etc. off/on
- It may take 10-15 seconds for your WiFi shield to appear in your WiFi options (be patient!)
- Once you connect your WiFi shield to a network, it will no longer appear in your WiFi options with its "OpenBCI-XXXX" unique ID. To make it reappear, you must launch the WiFi manager (instructions below) or "Erase Credentials" of the WiFi Shield.
- The WiFi shield does not work for Enterprise level security so use WiFi Direct mode or use your cellphone as a hot spot or set up your own wifi network.
Configure WiFi Station Mode
Follow this section if you want to put the WiFi Shield into WiFi Station mode. The WiFi Shield must be on the same wireless network as your computer, smart phone, or whatever other internet connected device you wish to talk to the WiFi Shield with. For example, in order to stream data into the OpenBCI GUI using your WiFi Shield in WiFi Station mode of operation, you must first make sure that your WiFi shield and computer that is running the OpenBCI GUI are on the same WiFi network.
For the rest of this tutorial, the WiFi needs to be powered independently, with Ganglion, WiFi Shield shall be disconnected, with Cyton, the EXT PWR shall be in the off position.
If you power the the WiFi Shield up and D2 LED does 4 blinks in 2 seconds followed within 10 seconds by 2 blinks in 2 seconds, then your WiFi Shield is on your local network. Feel free to head to skip a head to connecting with the OpenBCI GUI. If you want the WiFi Shield to join a different wireless network, continue reading and pay attention when it comes time to bring up the WiFi Manager.
Before the WiFi Shield has joined a network, the Shield acts as a WiFi hotspot, where the D2 LED blinks 10 times in 2 seconds and will have a name such as "OpenBCI-A4AD" where the last four digits are hexadecimal and are unique to your WiFi Shield.
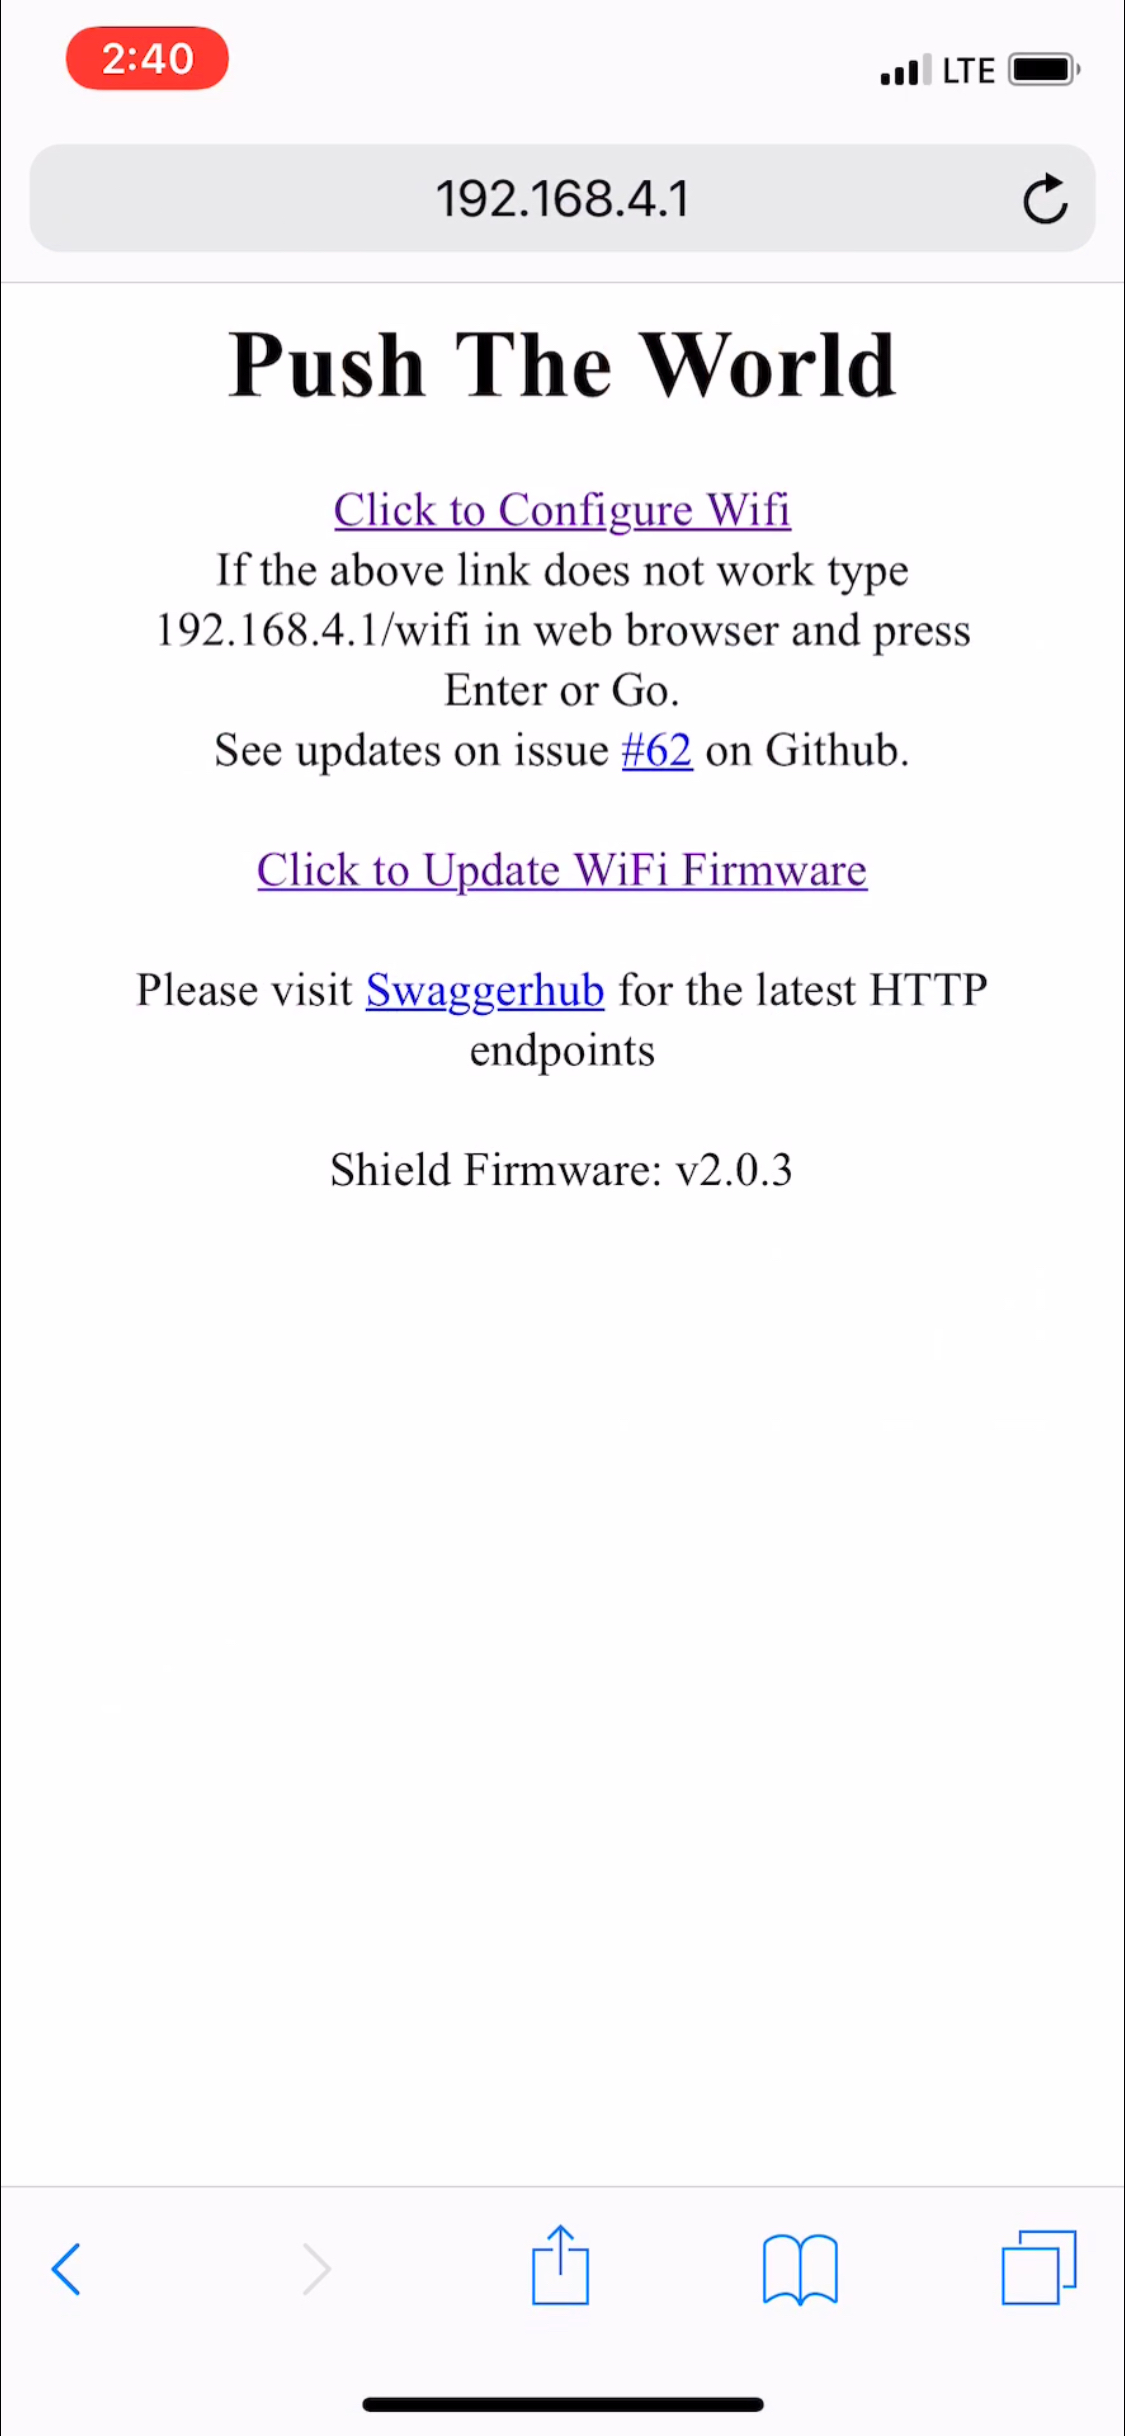
To connect your WiFi shield to your local WiFi network (or any other WiFi network), use any WiFi-enabled device to connect to the WiFi shield hotspot. Once connected to the WiFi Shield's network go to http:. A link to go to the WiFi manager should then be clicked and you will be taken to the WiFi Manager page. Then you can scan for wireless networks and save your wireless network credentials. A captive touch portal as shown in the screenshots below may appear after hitting the endpoint, if so, continue on either page.
Follow the below example that goes through the steps of connecting the WiFi Shield to a local WiFi networked called MeerkatManor. Note: in your case the network will not be called MeerkatManor but will instead be the name of whatever WiFi network you wish to connect your WiFi Shield to and share data across.
WiFi Station Example
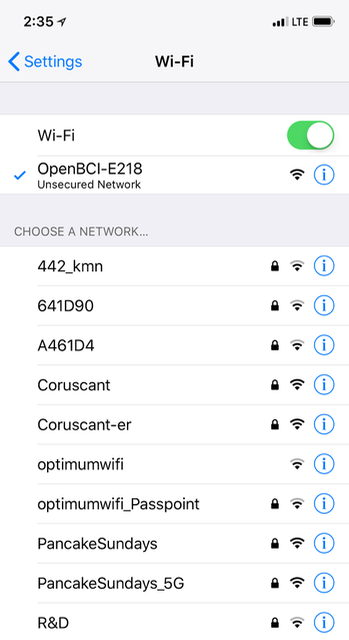
Your local WiFi network is called MeerkatManor and it is password protected. You turn on the WiFi on your smartphone and search for WiFi network options. Additionally, your WiFi Shield is connected to a battery and powered on (and not connected to an OpenBCI Board, or if Cyton, EXT PWR is OFF). Note what the D2 light does at start-up, if your In your iPhone's WiFi network options, you see MeerkatManor and "OpenBCI-A4AD" (the last 4 characters will be different in your case).
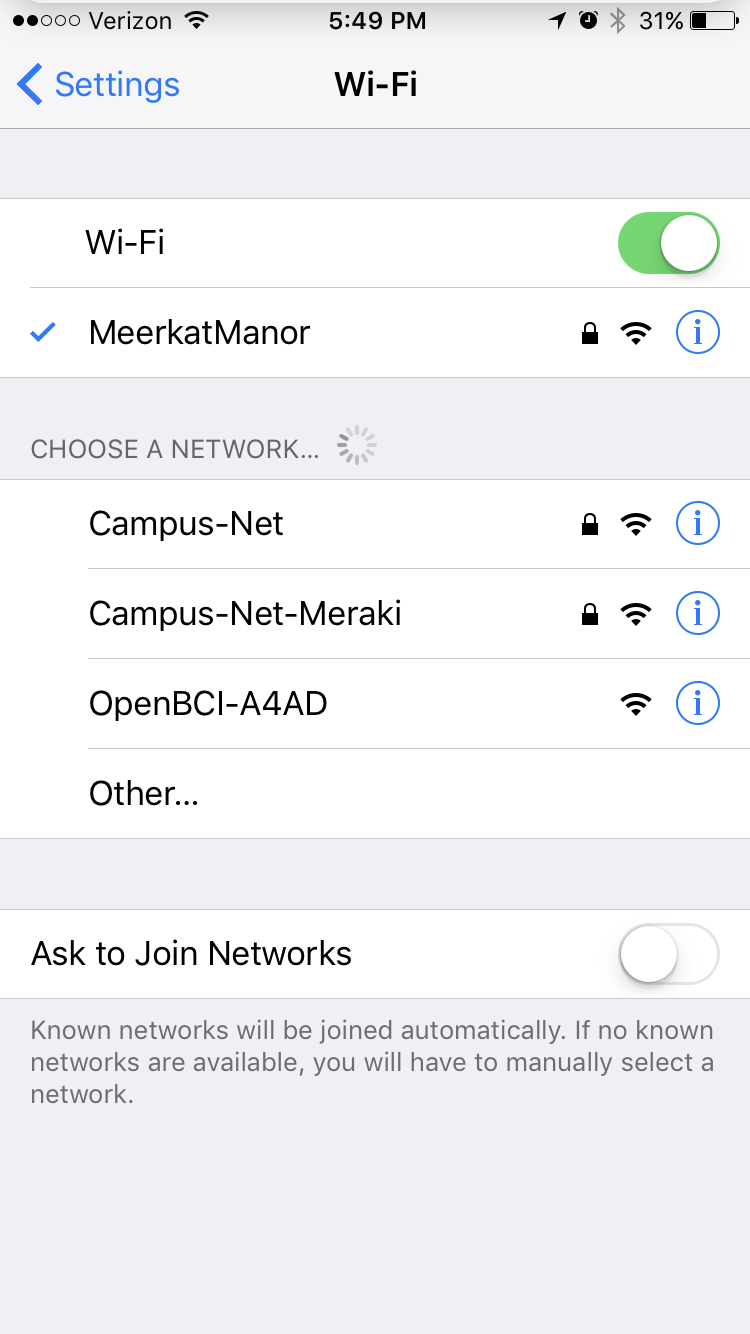
You click "OpenBCI-A4AD", in an attempt to connect to the WiFi Shield's hotspot.
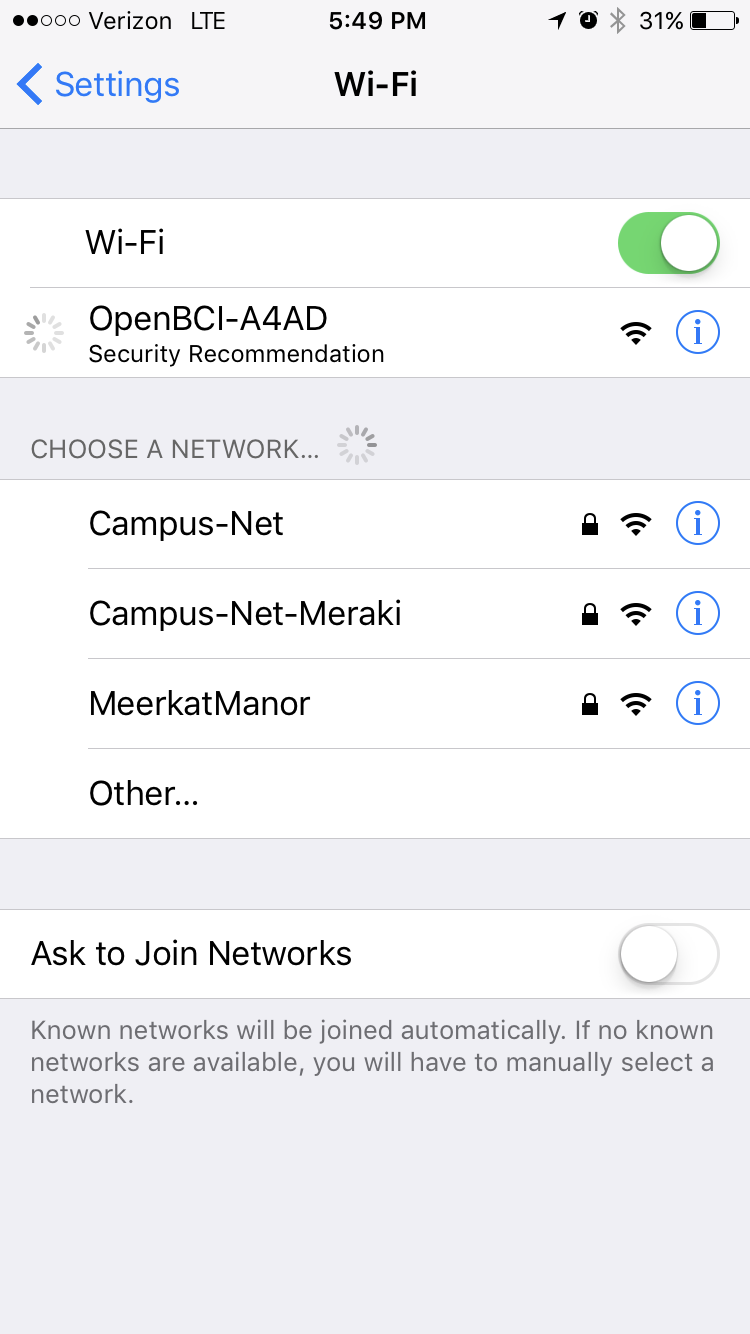
Your phone or computer will connect to the WiFi Shield's hotspot.
Launch your web browser and navigate to to start the WiFi Manager.
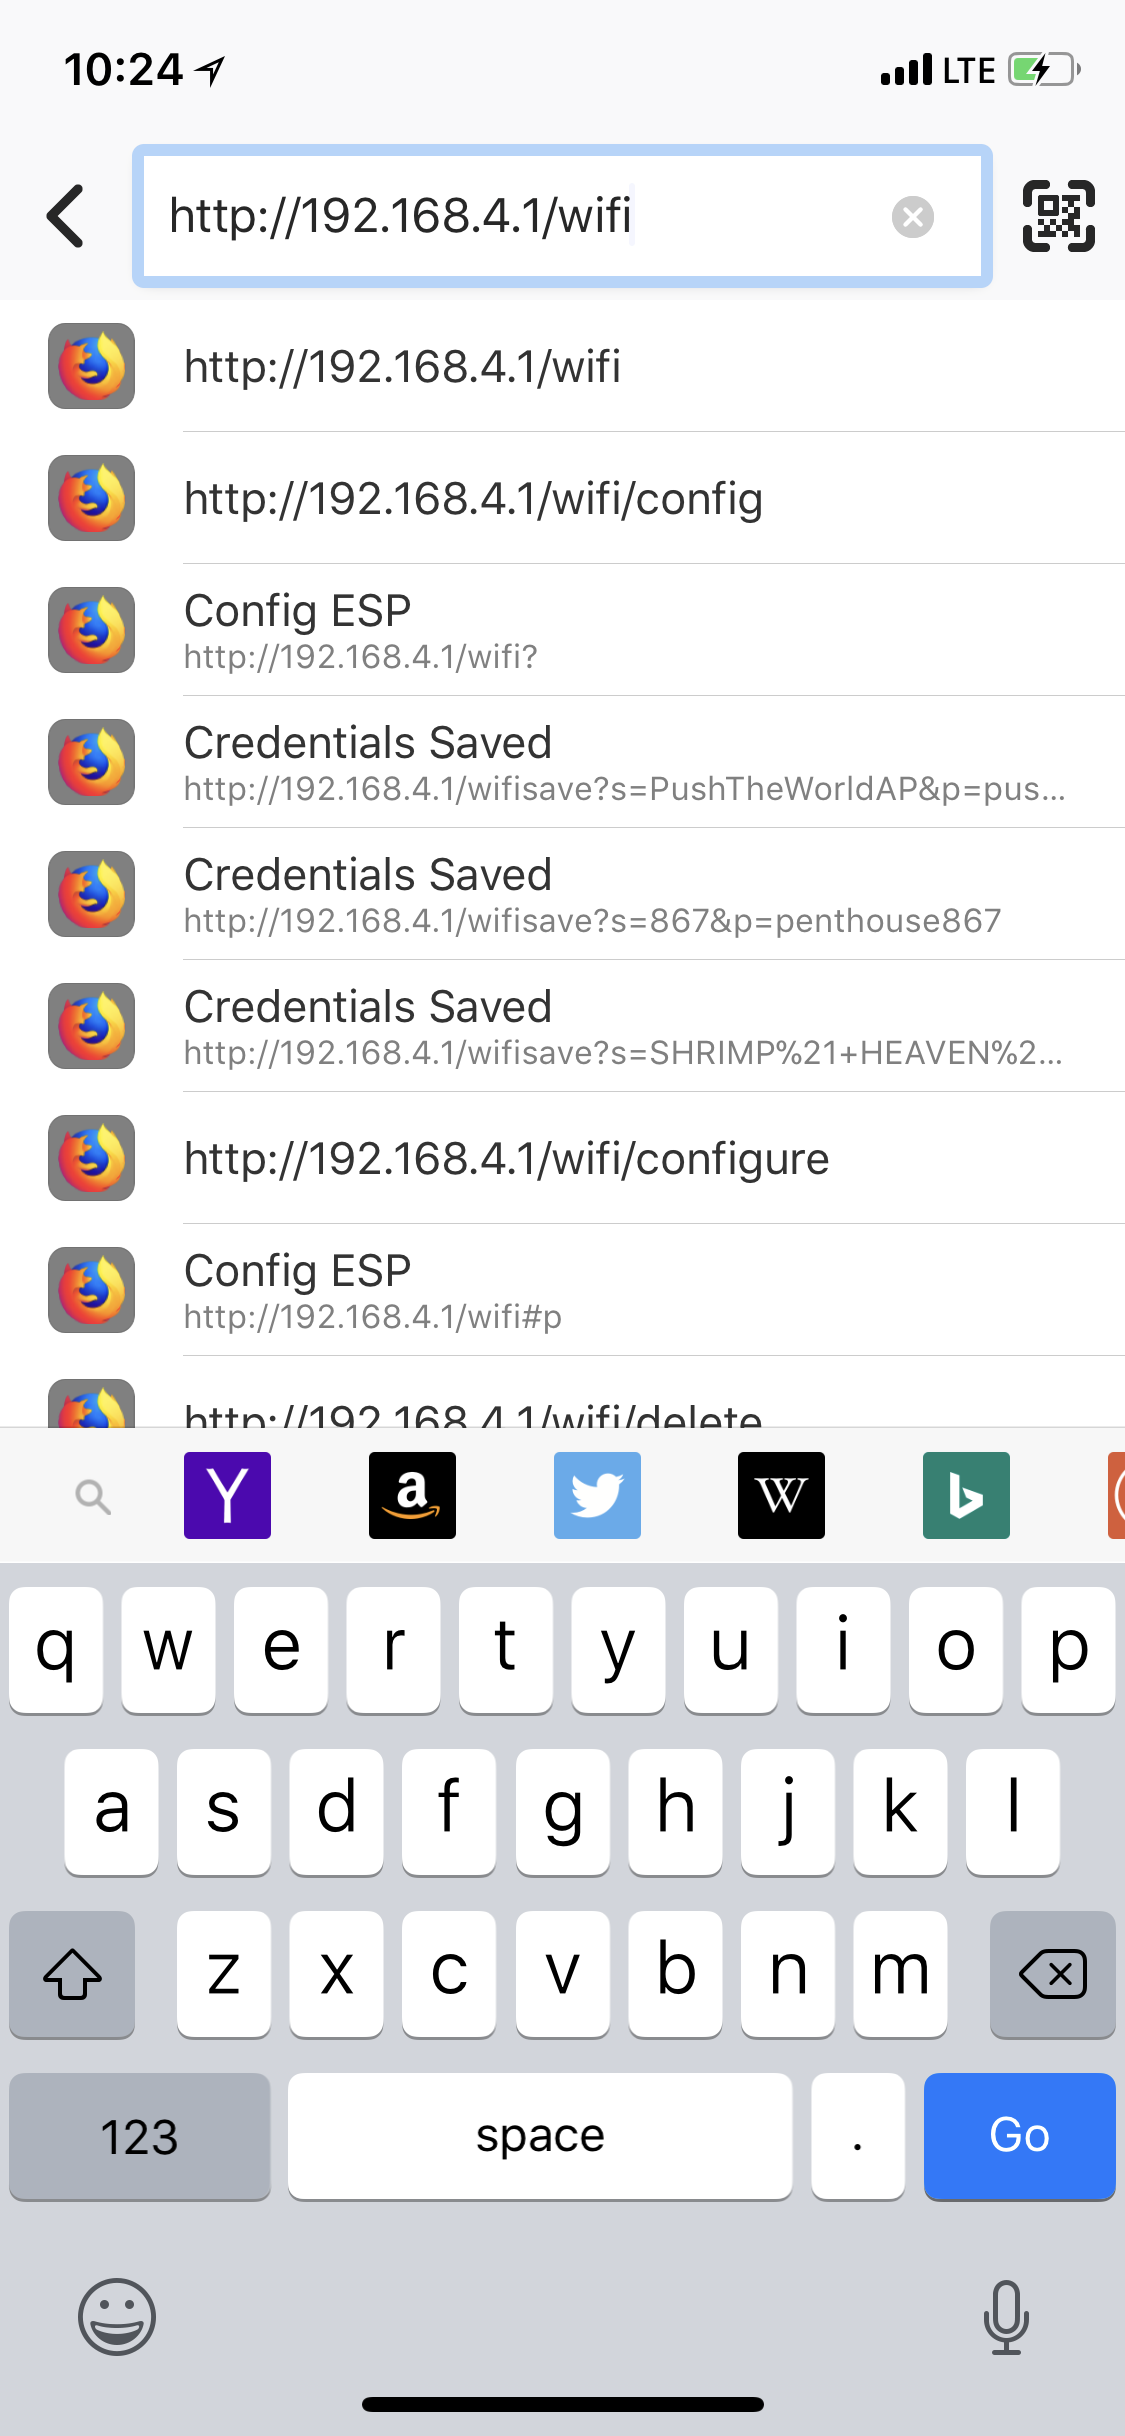
A success page will load with a hyperlink to the WiFi Manager.
You will be rerouted to the now started WiFi Manager.
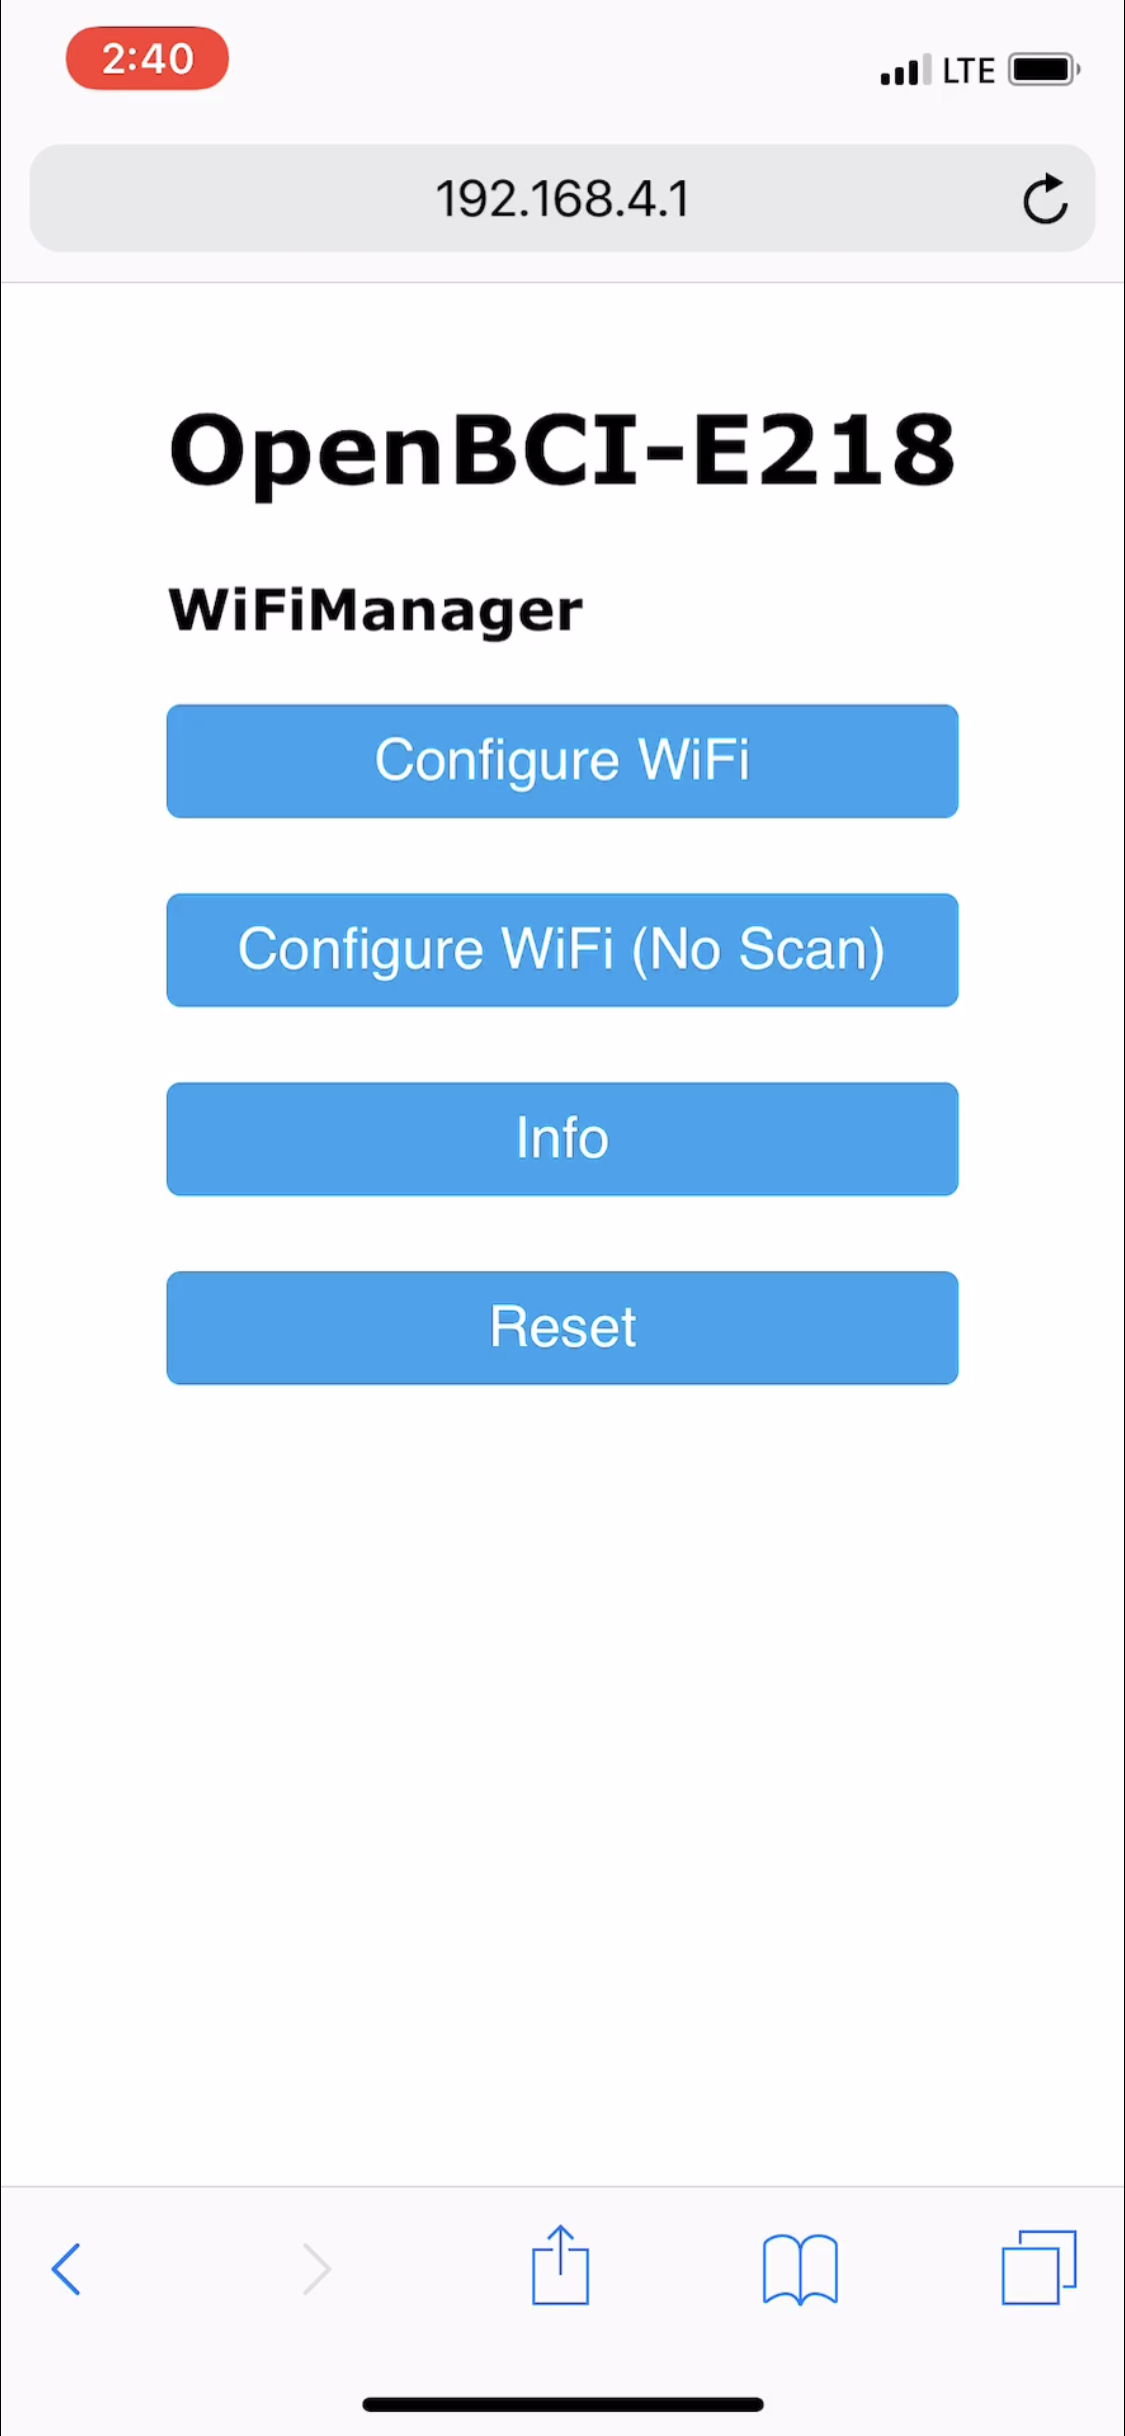
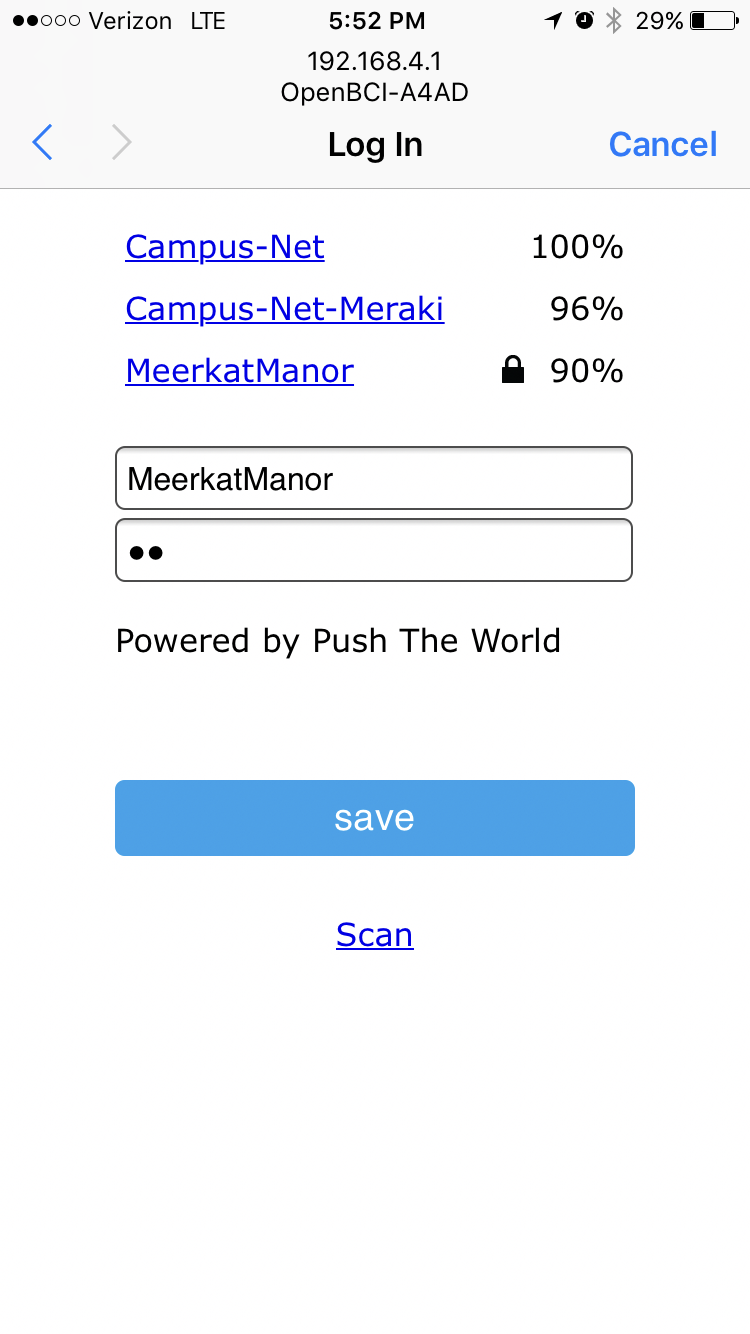
Click Configure WiFi to scan for nearby wireless networks or click Configure WiFi (No Scan) to enter the wireless network credentials. A captive touch portal may appear on the computer, phone or tablet, if so, continue the setup on the captive touch page if on mobile or ignore the portal on the computer if you want, either WiFi manager page will work!
On the next screen, see that MeerkatManor is listed as a possible network for the WiFi Shield to join. Select MeerkatManor and enter the password for the network and press save.
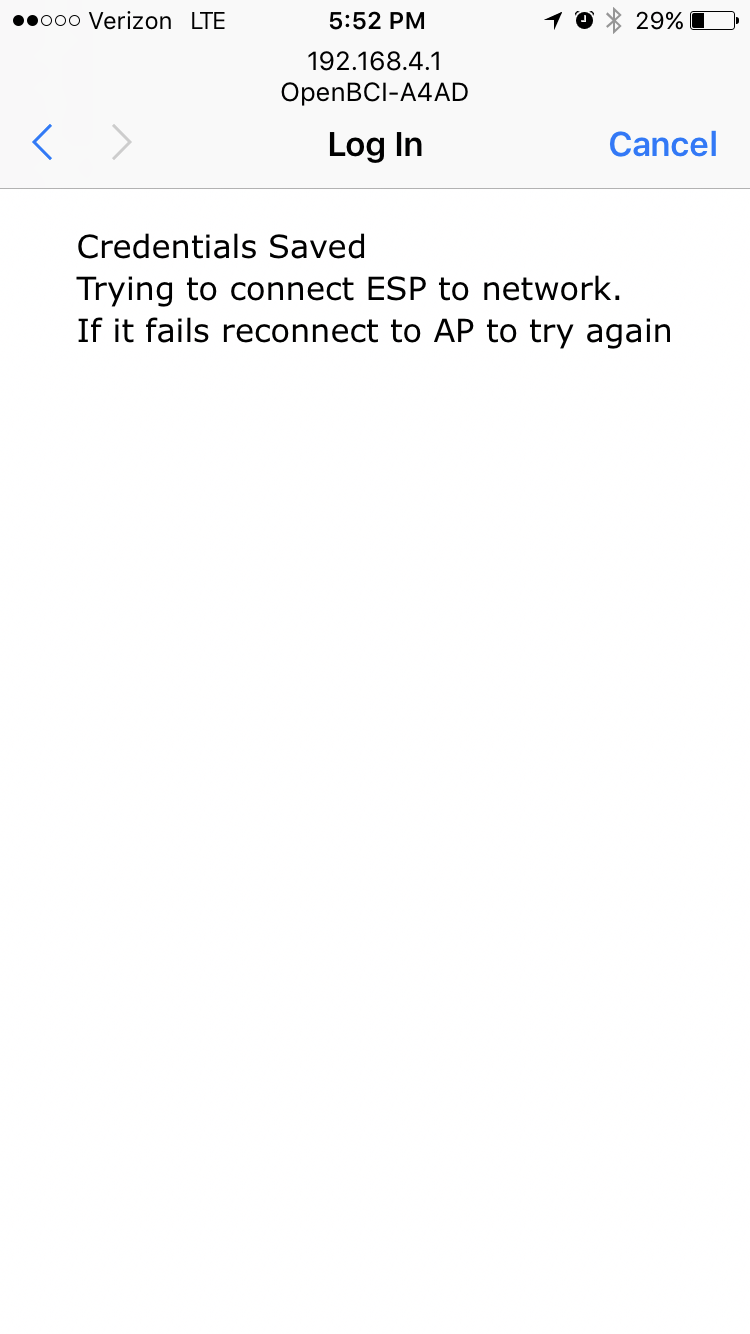
If the MeerkatManor password was entered correctly, then the WiFi Shield will join MeerkatManor after a quick reboot and every time the network is within range. Have fun streaming your brain waves over WiFi!
Note: the OpenBCI WiFi shield cannot be paired with multiple WiFi networks. However, if the WiFi Shield is out of range of the network it is currently paired with, it will reappear as a hotspot again, you'll see the D2 light flash 10 times in 2 seconds. At this point, if you reconnect to the hotspot and then connect the WiFi Shield to a different WiFi network. The previous network credentials will be overwritten by the new ones.
If you are a developer and want to control the WiFi Shield through HTTP commands checkout the WiFi Shield's web server specifications!
Change Stored Credentials
If your WiFi Shield blinks 4 times within 2 seconds followed by 2 blinks in 2 seconds then your WiFi Shield has an IP Address and is on a wireless network! If you want to change the credentials of the WiFi Shield, you must start the WiFi Manager or erase the stored wireless credentials. Using the WiFi Manager allows you to keep the WiFi Shield connected to an OpenBCI Board so the method is worth explaining. Erase the stored wireless credentials with a connected OpenBCI Board may not work because the OpenBCI Board will prevent the WiFi Shield from a required reset.
Use a computer to join the same wireless network as the stored wireless network credentials on the WiFi Shield. Get the IP Address using from the wireless network it's currently attached to, you can get the IP address of the WiFi shield, and in a web browser visit to start the WiFi Manager.
Now follow the example above for the WiFi Station Example to join the WiFi Shield's hotspot, use a web browser to go to and use the WiFi Manager to store the new wireless network credentials to flash memory.
Erase Stored Credentials
If the shield blinks four times within two seconds after power up, the WiFi Shield is searching for a wireless network that matches the wireless credentials stored in flash memory. If you see D2 LED blink 2 times in 2 seconds, then the WiFi Shield was successful in joining the wireless network matching the stored wireless network credentials in flash memory. If you see the D2 LED blink 10 times within 2 seconds, the WiFi Shield abandoned the search for a wireless network matching the wireless network credentials stored in flash memory.
You must erase the stored credentials or else the WiFi Shield will spend 10 seconds searching for the wireless network matching the wireless network credentials stored in flash memory. Note that if you are out of range of the stored wireless network, the WiFi Shield will search for the wireless network, fail to find it after 10 seconds of searching and switch to WiFi Direct mode and visually show that to you by blinking D2 10 times in 2 seconds.
There is a multitude of ways to erase stored wireless network configurations:
- Press "ERASE CREDENTIALS" of the WiFi Shield from the WIFI SHIELDS configuration inside the OpenBCI GUI. Make sure your WiFi Shield is not connected to an OpenBCI Board, or if Cyton,
EXT PWRis OFF). Tutorial link here. - On macOS/iPhone, go to your WiFi Shields home page in a web browser such as http://OpenBCI-A4AD.local (
OpenBCI-A4ADis the name of the WiFi Shield) and tap "Click to Erase WiFi Credentials". - On macOS/iOS, in a web browser go to http://OpenBCI-A4AD.local/wifi/delete (
OpenBCI-A4ADis the name of the WiFi Shield). - In any web browser on any device you can use the IP Address (OpenBCI GUI tutorial to get IP address) of the WiFi Shield and navigate to where the
192.168.1.100is substituted for the WiFi Shield's IP Address to trigger the erase.
- Send an HTTP DELETE request to
192.168.1.100/wifiwhere the192.168.1.100is the WiFi Shield's IP Address
If you erase the WiFi Shield's stored credentials, the WiFi Shield will immediately startup in WiFi Direct mode and that's indicated with 10 blinks in 2 seconds.
WiFi Direct Example
You want to directly connect your computer with the WiFi Shield. Your WiFi Shield is connected to a battery and powered on. If D2 blinks 10 times in two seconds the shield is ready to go! If this is not the case, follow the example above to erase the stored wireless network credentials from flash memory.
Connect your computer or phone to the WiFi Shield by joining the hotspot (a.k.a. wireless network, soft access point) broadcasted by the WiFi Shield.
Click "OpenBCI-A4AD", where your WiFi Shield is some other name such as OpenBCI-E318, in an attempt to connect to the WiFi Shield's hotspot.
Your phone or computer will connect to the WiFi Shield's hotspot.
Launch your web browser and navigate to to go to your WiFi's home page.
That's it! You're ready to stream high speed data from the WiFi Shield! You may use the OpenBCI GUI or any other interface such as NodeJS, python or many of the other new SDKs! Keep in mind the WiFi Shield's IP Address is set to 192.168.4.1.
If you are a developer and want to control the WiFi Shield through HTTP commands checkout the server specifications!
WiFi Configuration for Firmware 1.X.X
Get the WiFi Shield On Your Wireless Network
The WiFi Shield must be on the same wireless network as your computer, smart phone, or whatever other internet connected device you wish to talk to the WiFi Shield with. For example, in order to stream data into the OpenBCI GUI using your WiFi Shield, you must first make sure that your WiFi shield and computer that is running the OpenBCI GUI are on the same WiFi network.
Before the WiFi Shield has joined a network, the Shield acts as a WiFi hotspot, and will have a name such as "OpenBCI-A4AD" where the last four digits are hexadecimal and are unique to your WiFi shield.
To connect your WiFi shield to your local WiFi network (or any other WiFi network), use any WiFi-enabled device to connect to the WiFi shield hotspot. Doing this launches the captive touch portal as shown in the screenshots below. The captive touch portal is used to connect your WiFi shield to your local WiFi network (or any other WiFi network) so that it can share data across that network.
Important Notes Before You Continue:
- If you are able to join the WiFi network but a captive portal does not come up, use a web browser to go to http://192.168.4.1
- In order to unpair your WiFi Shield with a WiFi network (or update its firmware), it cannot be under control of an OpenBCI Board (Cyton or Ganglion). It needs to be powered separately, with Ganglion, WiFi Shield shall be disconnected, with Cyton, the
EXT PWRshall be in the off position. Why? So the WiFi Shield can effectively power cycle. - If you have trouble joining the WiFi Shield network, turn the WiFi of your phone/computer/etc. off/on
- It may take 10-15 seconds for your WiFi shield to appear in your WiFi options (be patient!)
- Once you connect your WiFi shield to a network, it will no longer appear in your WiFi options with its "OpenBCI-XXXX" unique ID. To make it reappear, you must first "ERASE CREDENTIALS" of the WiFi Shield from the WIFI SHIELDS configuration inside the OpenBCI GUI
- The WiFi shield does not work for Enterprise level security. Use your cellphone as a hot spot or set up your own wifi network if this is an issue. Update to firmware v2.0.0 or later to use WiFi Direct as another alternative.
Follow the below example that goes through the steps of connecting the WiFi Shield to a local WiFi networked called MeerkatManor. Note: in your case the network will not be called MeerkatManor but will instead be the name of whatever WiFi network you wish to connect your WiFi Shield to and share data across.
Example
Your local WiFi network is called MeerkatManor and it is password protected. You turn on the WiFi on your smartphone and search for WiFi network options. Additionally, your WiFi Shield is connected to a battery and powered on (and not connected to an OpenBCI Board!). In your iPhone's WiFi network options, you see MeerkatManor and "OpenBCI-A4AD" (the last 4 characters will be different in your case).
You click "OpenBCI-A4AD", in an attempt to launch the captive touch portal.
Note: there is a known issue where it may take several times to bring up the captive touch portal. Push The World is actively seeking a better solution, in the meantime, be patient and try multiple times to connect to the board. Power cycling the board may useful.
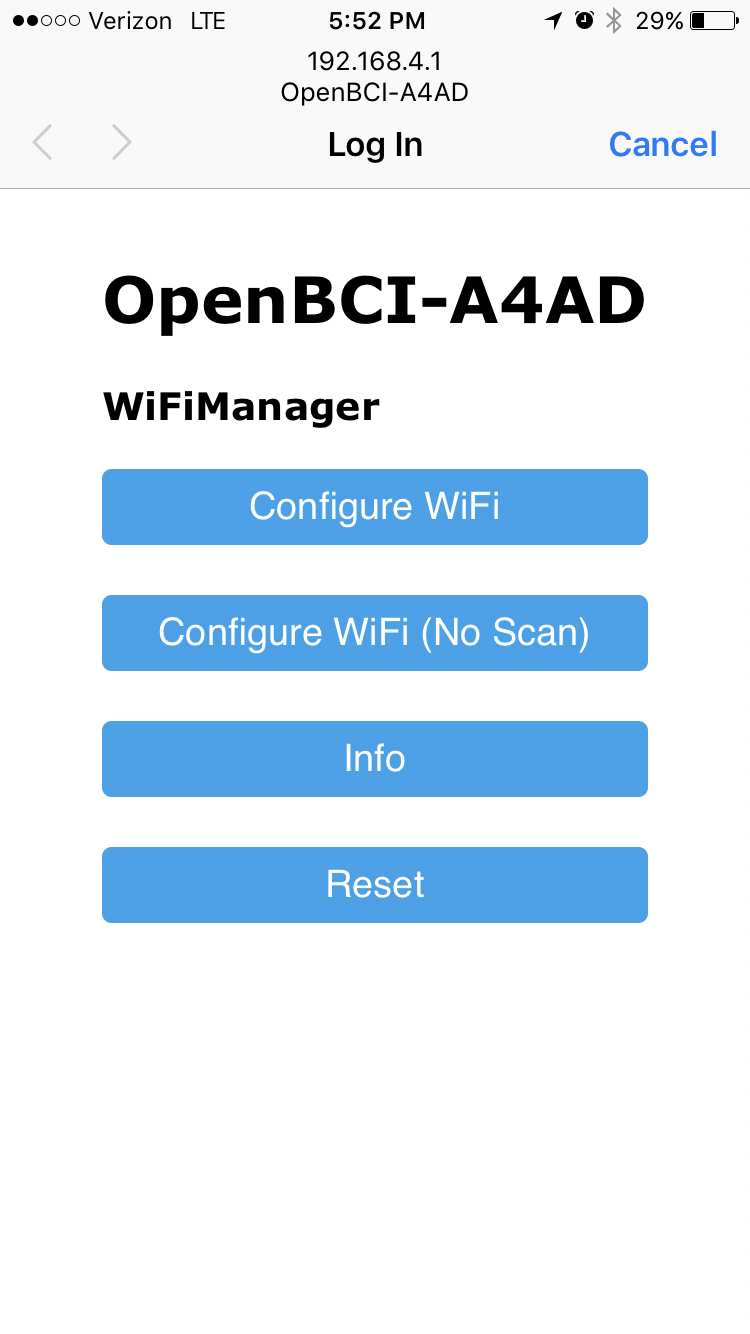
After a couple seconds a captive touch portal will appear on the computer, phone or tablet. Click Configure WiFi.
On the next screen, see that MeerkatManor is listed as a possible network for the WiFi Shield to join. Select MeerkatManor and enter the password for the network and press save.
If the MeerkatManor password was entered correctly, then the WiFi Shield will join MeerkatManor after a quick reboot and every time the network is within range. Have fun streaming your brain waves over WiFi!
Note: the OpenBCI WiFi shield cannot be paired with multiple WiFi networks. However, if the WiFi Shield is out of range of the network it is currently paired with, it will reappear as a hotspot again. At this point, if you reconnect to the hotspot and then connect the WiFi Shield to a different WiFi network. The previous network credentials will be overwritten by the new ones.
If you are a developer and want to control the WiFi Shield through HTTP commands checkout the server specifications!
Connecting with the OpenBCI GUI
Although the WiFi Shield can be connected to any internet connected device, the OpenBCI_GUI provides a great application to get started!
Download/Install/Run the OpenBCI GUI
The OpenBCI GUI gained WiFi Shield support as of v3.0.0 or later.
Please follow the step by step guide to install the OpenBCI_GUI as a standalone application. WiFi has no other prerequisites.
Come back to this guide when your GUI is running!
Streaming Data On Cyton
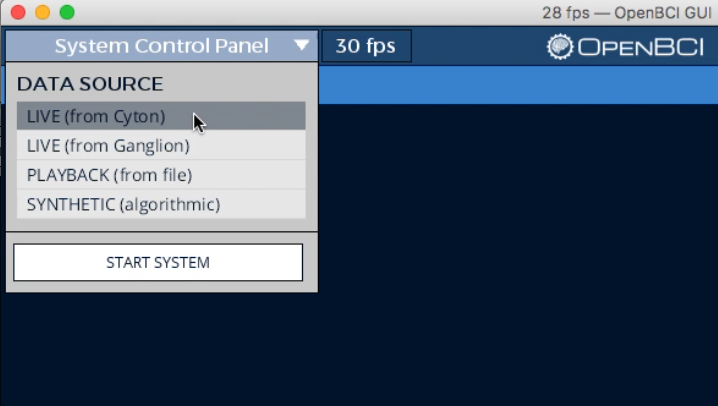
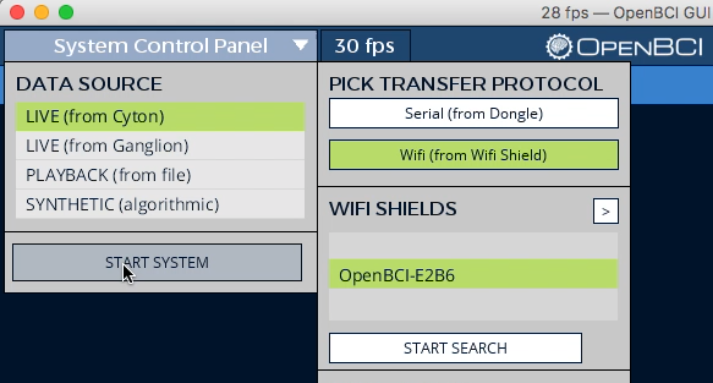
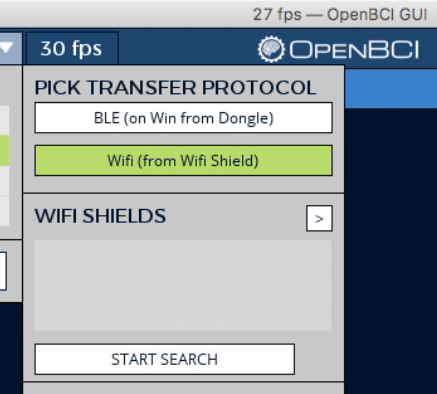
Select LIVE (from Cyton) from the first drop down
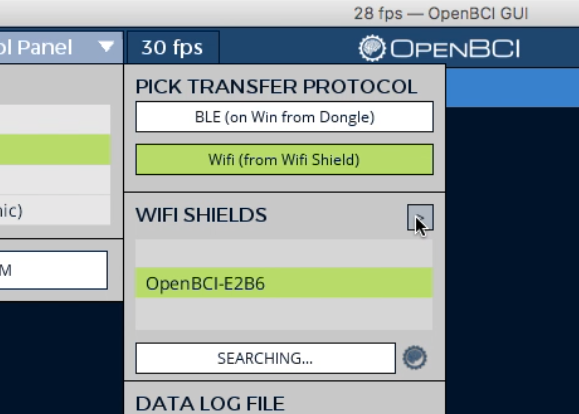
Select Wifi (from WiFi Shield) as the transfer protocol
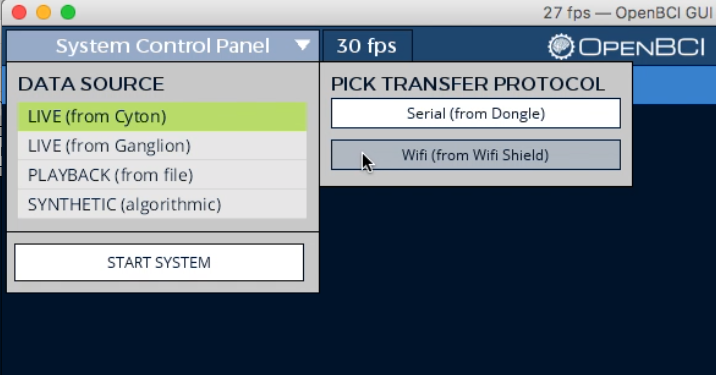
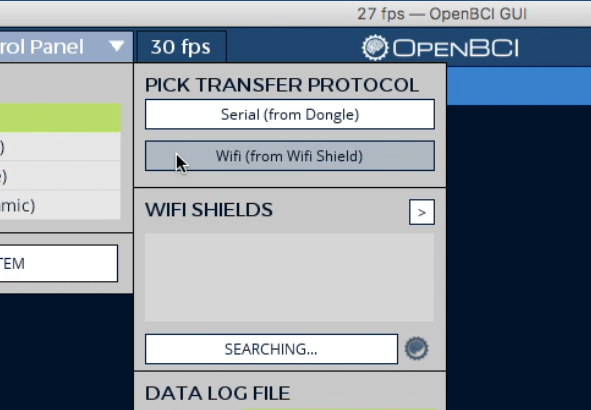
The GUI will automatically start searching for WiFi Shields
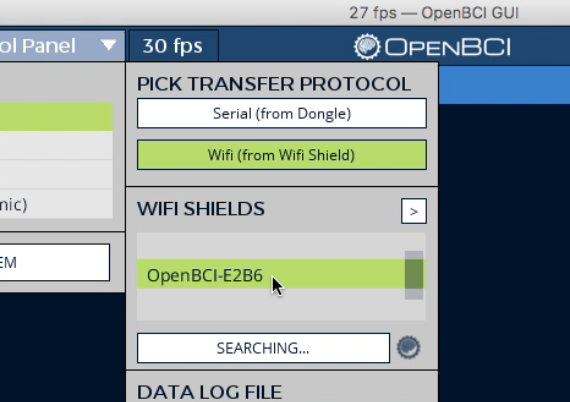
Select the desired WiFi Shield from the dropdown list
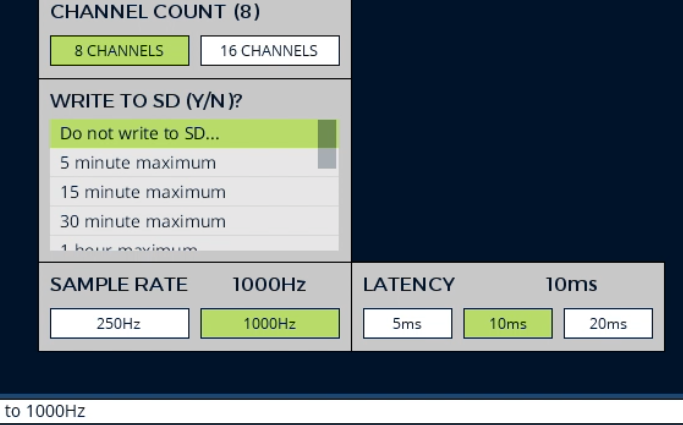
The Cyton will default to a sample rate of 1000Hz with a latency of 10ms. For the majority of modern data WiFi networks these settings will work. If your data transfer LED (D2 on WiFi Shield) is not solid blue, then you should try adjusting your sample rate and latency while you determine your wireless network problems.
Press START SYSTEM when you're ready to begin streaming.
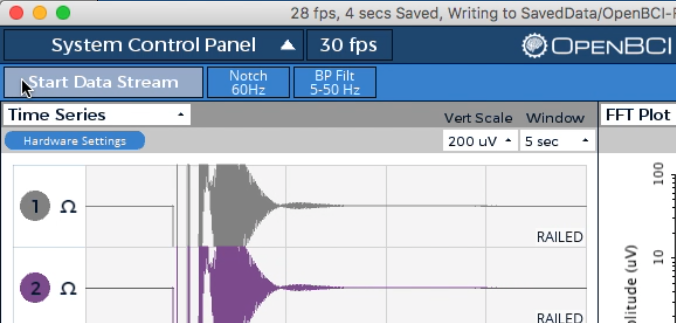
Press Start Data Stream to begin streaming!
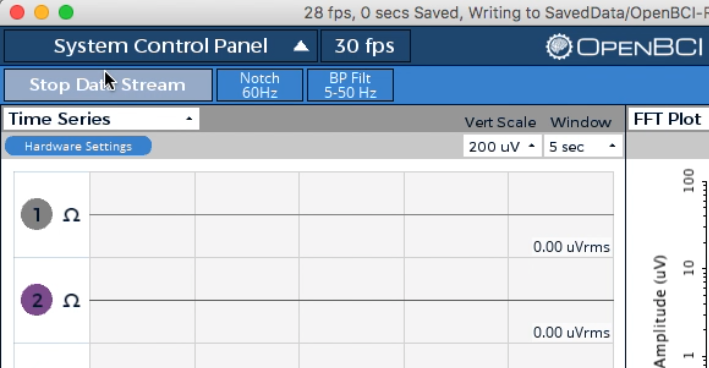
When you are finished recording, you may press Stop Data Stream
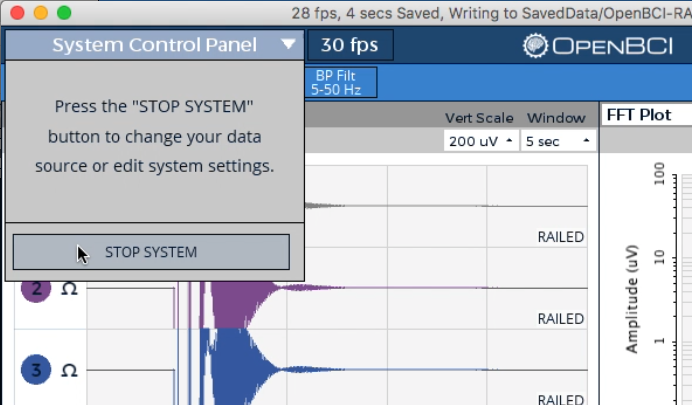
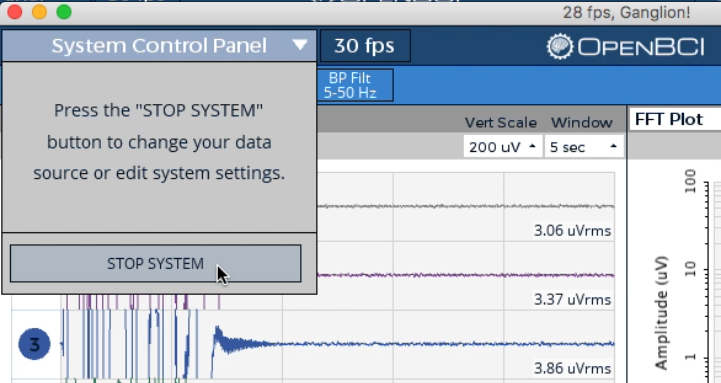
Then end your session by pressing STOP SYSTEM from the System Control Panel drop down.
If you are unable to connect to the board
- Verify the EXT PWR switch is in the ON position.
- Verify you do not have a battery in the Cyton
- Verify the latest firmware on the Cyton
- Verify the latest firmware on the WiFi Shield
Streaming Data On Ganglion
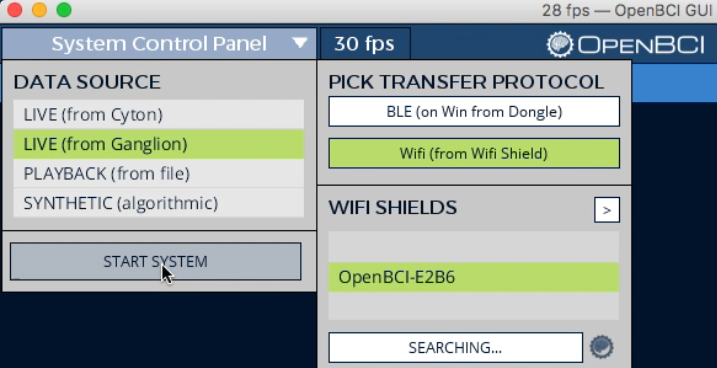
Select LIVE (from Ganglion) from the first drop down
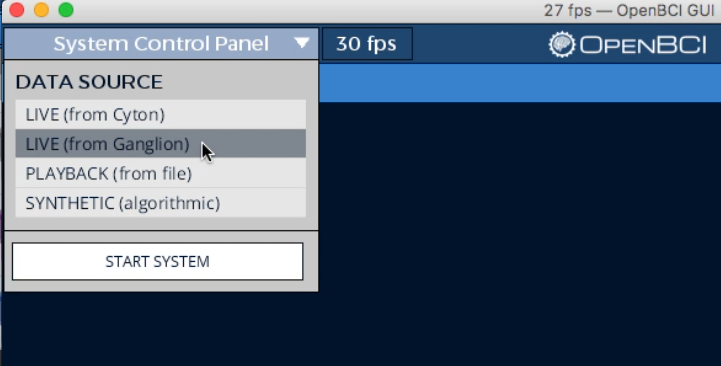
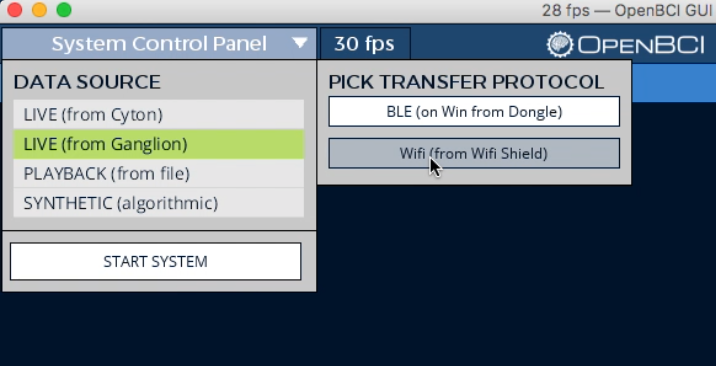
Select Wifi (from WiFi Shield) as the transfer protocol
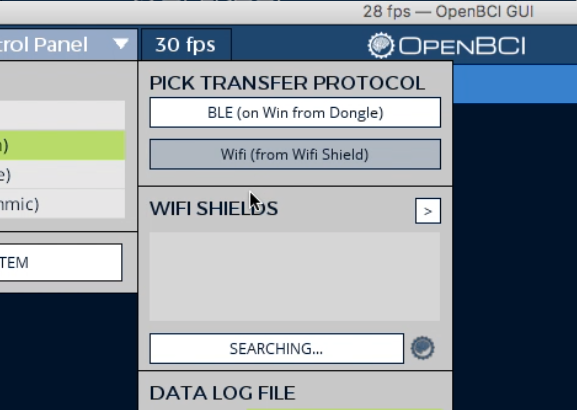
The GUI will automatically start searching for WiFi Shields
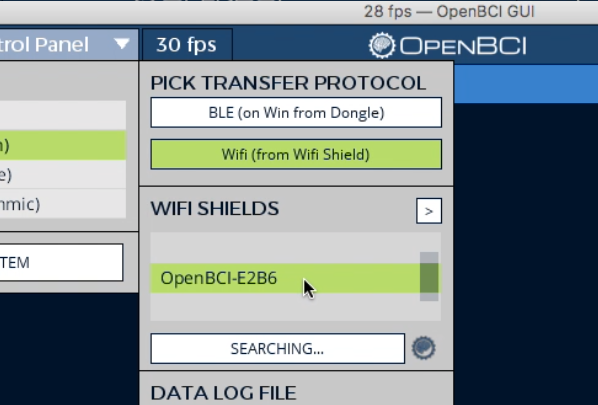
Select the desired WiFi Shield from the dropdown list
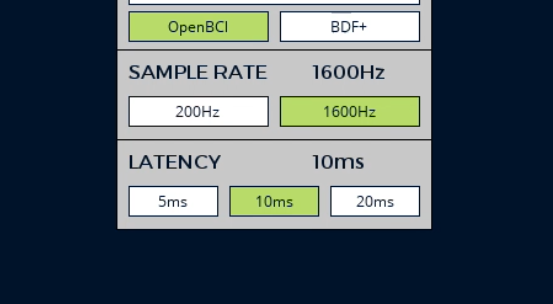
The Ganglion will default to a sample rate of 1600Hz with a latency of 10ms. For the majority of modern data WiFi networks these settings will work. If your data transfer LED (D2 on WiFi Shield) is not solid blue, then you should try adjusting your sample rate and latency while you determine your wireless network problems.
Press START SYSTEM when you're ready to begin streaming.
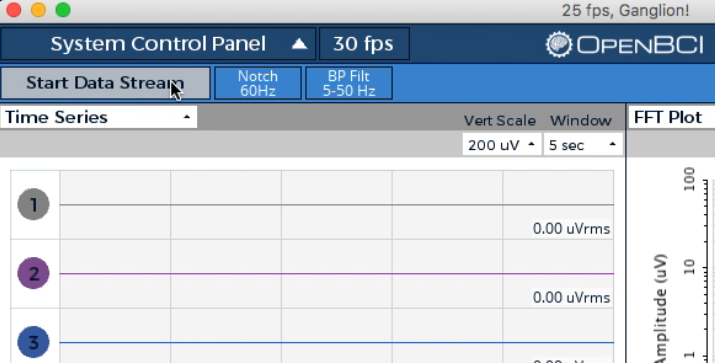
Press Start Data Stream to begin streaming!
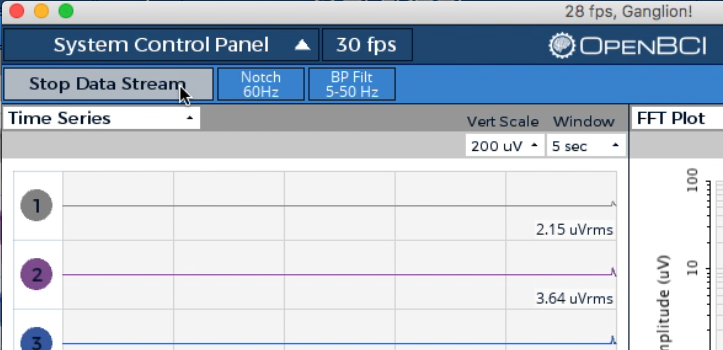
When you are finished recording, you may press Stop Data Stream
Then end your session by pressing STOP SYSTEM from the System Control Panel drop down.
If you are unable to connect to the board
- Verify all three LEDs on the WiFi Shield are solid on.
- If using the Ganglion to power the WiFi Shield, verify the
EXT PWRswitch is in theONposition. - If using two batteries, verify the
EXT PWRswitch is in theOFFposition and be sure to always turn the WiFi Shield on before the Ganglion. - Verify the latest firmware on the Ganglion
- Verify the latest firmware on the WiFi Shield
Get WiFi Shield IP, Mac Address, Firmware Version and more
Select LIVE (from Ganglion) or LIVE (from Cyton) from the first drop down
Select Wifi (from WiFi Shield) as the transfer protocol
The GUI will automatically start searching for WiFi Shields
Select the desired WiFi Shield from the dropdown list
Select the right carrot button to open the WiFi Configuration window
If the connection to the WiFi Shield was successful, you will see a success message.
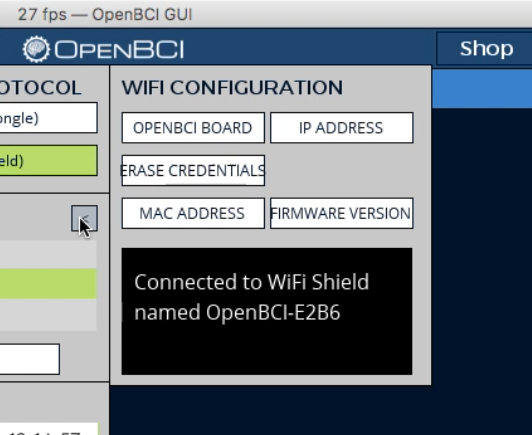
When you are finished, press the left facing caret to close the WiFi Configuration window.
Get WiFi Shield Firmware Version
To verify you have the latest OpenBCI_Wifi firmware version, select FIRMWARE VERSION from the WiFi Configuration menu
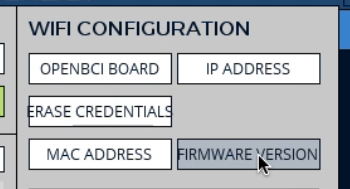
Compare the firmware version with the latest OpenBCI_Wifi firmware available and download/update your firmware if it's outdated.
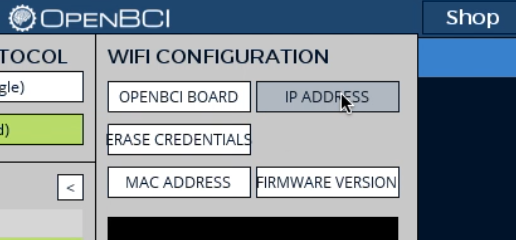
Get WiFi Shield IP Address
To get the Wifi Shield IP Address, select IP ADDRESS from the WiFi Configuration menu
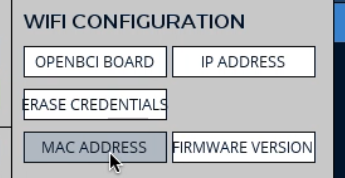
Get WiFi Shield Mac Address
To get the Wifi Shield IP Address, select MAC ADDRESS from the WiFi Configuration menu
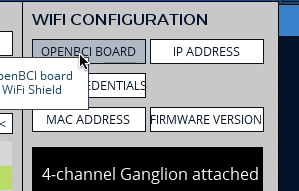
What OpenBCI Board is Connected to the Wifi Shield
If you are having trouble starting to stream with the GUI, then select OPENBCI BOARD to verify the WiFi Shield is attached properly to the Cyton or Ganglion.
Erase WiFi Credentials
If you want to switch what WiFi network your WiFi Shield is on, you can select ERASE CREDENTIALS. NOTE: WiFi Shield must be detached from Ganglion or Cyton.
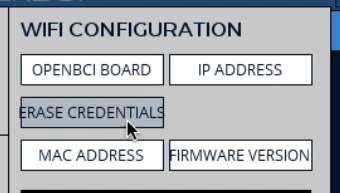
The GUI will automatically detach from the WiFi Shield. Your WiFi Shield should now be a hotspot which you can join to give the WiFi Shield the credentials for the new network.
Helpful links and resources
Before we jump into setting up your WiFi Shield, here are some helpful links:
- Learn to update your WiFi Shield to the latest firmware.
- Learn about the physical hardware on the WiFi Shield checkout the OpenBCI Wifi Hardware docs
- Lookup the commands for the HTTP rest server on the WiFi Shield at the swaggerhub.io
- Checkout the firmware that powers the WiFi Shield at on Github