Cyton Board Programming Tutorial
You do not need to do any board programming if you want to use the Cyton out-of-the-box. All OpenBCI boards ship already programmed (i.e., with firmware uploaded). Email support@openbci.com before attempting to update or alter board firmware, or if you think there is an issue with your board. DO NOT attempt to upload firmware to your board unless specifically instructed to do so.
If you're curious about how we do it, keep reading! If you want to start streaming EEG/EMG/ECG data right away, head over to Getting Started. Happy bio-sensing!
Overview
The OpenBCI Cyton boards have powerful microcontrollers that ship with the latest OpenBCI firmware to interface with the onboard ADS1299, accelerometer, and SD card. This tutorial explains how to program the firmware using the OpenBCI Dongle and your PC. If we release a firmware upgrade, or if you or someone else comes up with a custom program that you want to implement, you should use the following method. We made major changes to the Cyton firmware in 2016 with v2.x and again in 2017 with v3.x. This tutorial covers v2 and v3. The v1 firmware has been deprecated and is no longer in production. Happy hacking!
Firmware Versions 2.x.x & 3.x.x (Fall 2016 - present)
These instructions apply to programming the Cyton with firmware versions 2.x.x, 3.x.x, and onwards! The radio firmware (the firmware for the dongle and the radio module on your Cyton Board) has not been updated since prior to Fall 2016, so as long as you purchased your Cyton Board after that date, you do not need to worry about reprogramming your radios.
You will need:
-
Arduino IDE 1.8.x (1.8.19 recommended). You can find this in the legacy page of the Arduino Downloads section. Arduino IDE 2.x is not supported for this tutorial.
-
OpenBCI Dongle connected to USB port
-
OpenBCI Cyton Board with battery power
-
OpenBCI Cyton Firmware (follow guide below to download)
-
OpenBCI Cyton SD Firmware (follow guide below to download)
-
OpenBCI WiFi Master Firmware (follow guide below to download)
Note for Windows users: While installing Arduino IDE 1.8.19, if the installer instructs you to uninstall 1.5.8, move the Arduino folder containing 1.5.8 from Program Files to your desktop or another folder. Rename this folder to Arduino_1.5.8. Open the Change or remove program app in Control Panel and uninstall the Arduino application. There will be a popup indicating that the files do not exist and asking if you want to remove the program from the files list; select yes. Then install Arduino IDE 1.8.19 as normal. Navigate back to your Program Files folder and locate the Arduino folder. Rename this folder to Arduino_1.8.19. Now drag and drop the Arduino_1.5.8 folder back into the Program Files folder.
Install Firmware From Arduino Library Manager (easiest!)
Don't know what the Library Manager is? Skim over the Official Arduino Guide.
Open the Library Manager and search for OpenBCI. Install the latest versions of OpenBCI_32bit_Library, OpenBCI_32bit_SD, and OpenBCI_Wifi_Master.
Now jump down to the section install ChipKit Core
Manual Installation of Cyton Firmware
-
Download the latest OpenBCI_32bit_Library; it's the topmost zip file.
-
Unzip the folder and rename it to
OpenBCI_32bit_Library -
Move
OpenBCI_32bit_Libraryto:On Mac:
/Documents/Arduino/libraries
On Windows:C:\Users\username\Documents\Arduino\libraries
If you're having trouble or want to learn more, check out the Official Arduino Guide for manual installation.
Manual Installation of Cyton SD Library
-
Download the latest OpenBCI_32bit_SD; it's the topmost zip file.
-
Unzip the folder and rename it to
OpenBCI_32bit_SD -
Move
OpenBCI_32bit_SDto:On Mac:
/Documents/Arduino/libraries
On Windows:C:\Users\username\Documents\Arduino\libraries
If you're having trouble or want to learn more, check out the Official Arduino Guide for manual installation.
Manual Installation of WiFi Master Firmware
-
Download the latest WiFi Master Library; it's the topmost zip file.
-
Unzip the folder and rename it to
OpenBCI_Wifi_Master -
Move
OpenBCI_Wifi_Masterto:On Mac:
/Documents/Arduino/libraries
On Windows:C:\Users\username\Documents\Arduino\libraries
If you're having trouble or want to learn more, check out the Official Arduino Guide for manual installation.
Clone The Repos From Github
Developers looking to contribute or write custom firmware can clone the firmware repositories directly to your libraries folder:
On Mac: `/Documents/Arduino/libraries`
On Windows: `C:\Users\username\Documents\Arduino\libraries`
Install ChipKIT Core Firmware
- Before you can upload code correctly to the PIC32 with Arduino, you need to add the chipKIT-core board files to your Arduino IDE. The folks at chipKIT have put together instructions on how to Auto Install via URL from within Arduino.
NOTE: The latest ChipKIT firmware may cause improper flashing of the device firmware. In such a case (e.g., no data stream from the board or no device ID and accelerometer ID after soft resetting the board), select firmware version 1.3.1.
Select 'OpenBCI 32' as Board
If you followed the process in the previous link, you will be able to select the OpenBCI 32 board from the Tools > Board > dropdown menu!
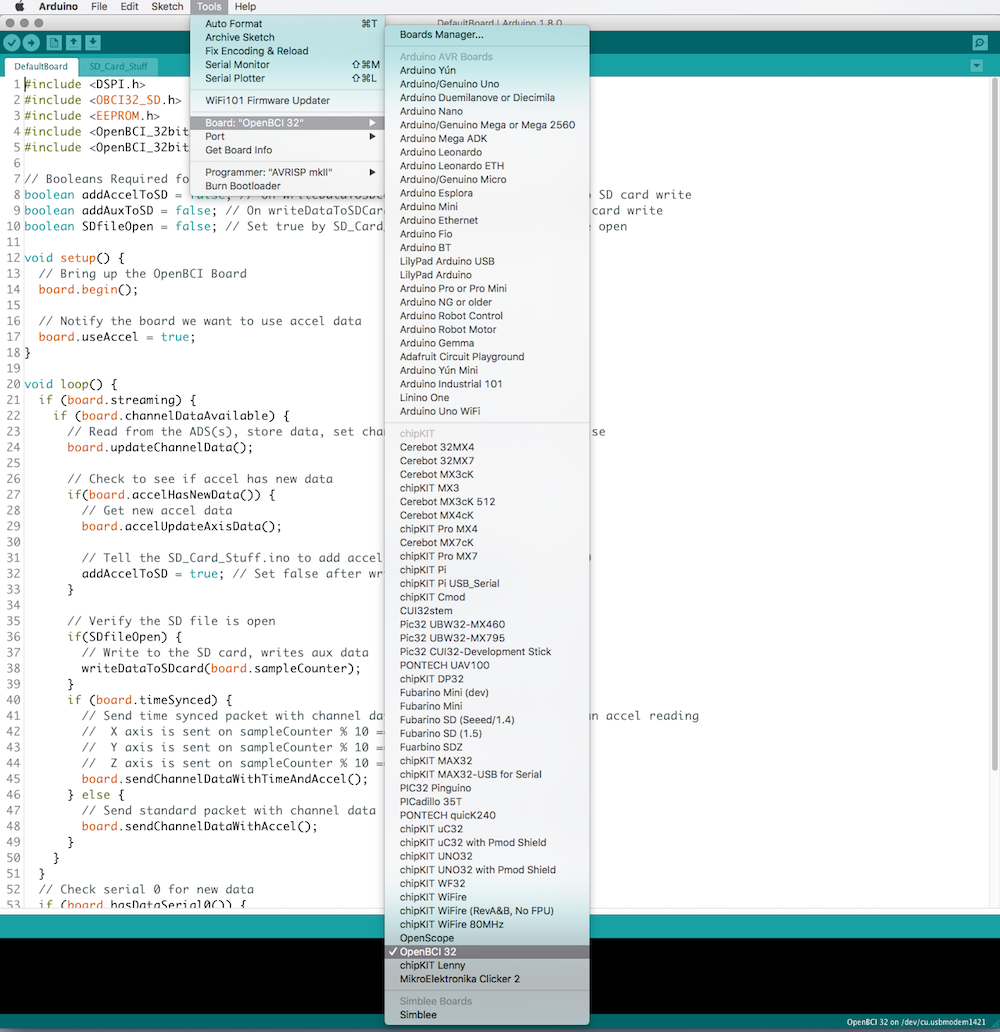
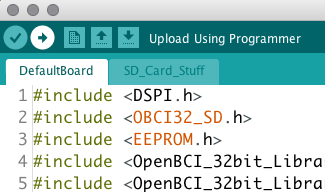
Select DefaultBoard.ino from Examples
- In the Arduino IDE, go to
File > Examples > OpenBCI_32bit_Library > DefaultBoardto launch the Cyton firmware. NOTE: You must upload ONLY theDefaultBoardSketch!
Dongle Switch Selection
- Make sure that the slide switch on the OpenBCI Dongle is switched to GPIO6. If it's on RESET, it will try to program the Dongle-mounted RFduino!
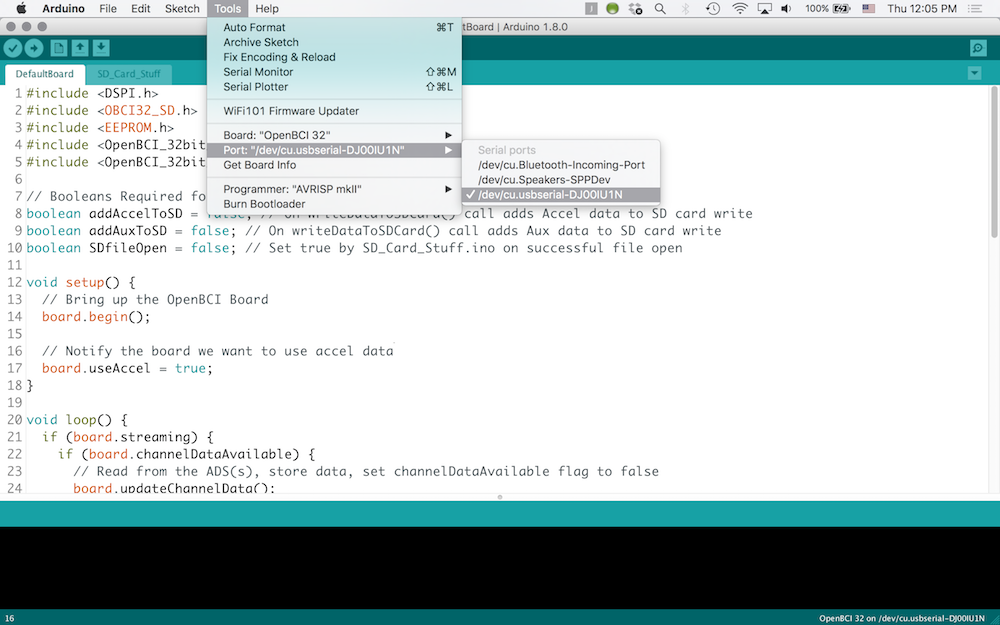
Plug in Dongle and Select Serial Port
Plug in the Dongle to your computer and select the Serial port as shown below.
- On MacOS, this will be named /dev/cu.usbserial-DN00nnnn, where the nnnn is a combination of numbers and letters specific to your OpenBCI Dongle.
- On Windows, the serial port will be listed as a numbered COM port.
- On Linux, it will be different.
Put Cyton in Bootloader Mode
- When you are happy with the code, you will have to put the 32-bit board into bootloader mode. We don't have a way to remotely reset the chipKIT-compatible IC, so you have to do it manually with the procedure that follows:
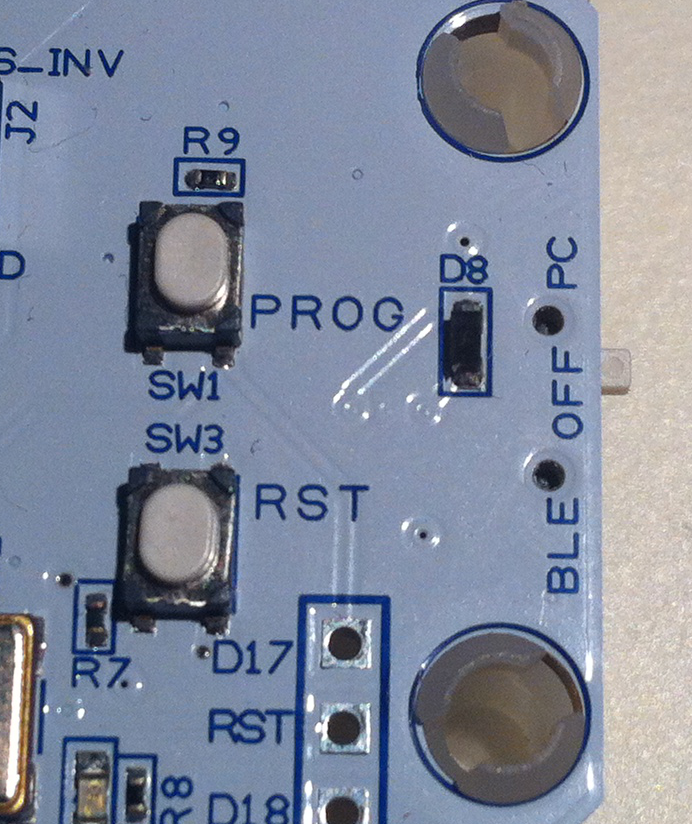
- Power OFF the OpenBCI Board.
- Press down both RST and PROG buttons at the same time.
- Power ON the OpenBCI Board.
- Release the RST button while still holding down the PROG button.
- Release the PROG button.
- Verify that you see the blue LED on the 32-bit board blinking as shown below
Upload the Firmware
- Press the upload button on the Arduino IDE.
-
The Arduino IDE will first compile your code and then upload the compiled hex file.
-
Once the upload is complete and successful, the Arduino IDE will display a success message as shown below.

Troubleshooting
If you're having an issue with Board_Defs.h and you're uploading using Linux, you must move ALL files located in /Arduino/hardware/chipkit-core/pic32/variants/openbci/ to /Arduino/hardware/chipkit-core/pic32/cores/pic32/. This should fix any issues you're having compiling.
If the upload fails with No Target Found:
- Unplug the Dongle and power OFF the Cyton Board.
- Plug the Dongle into your computer.
- Power ON the OpenBCI Board.
- Put the Cyton into bootloader mode.
- Try upload again.
If the upload fails with Program Flash Failed it's due to the Arduino IDE not being able to read from the serial port fast enough possibly do to resource starvation or overall computer power. We recommend taking the following actions:
- Keep the Board and Dongle physically close to each other during the upload.
- Keep the Arduino IDE open, front and center and don't use any other programs during the upload.
- Close all open programs and only have the Arduino IDE open during upload.
- Restart your computer and don't open any other programs other than the Arduino IDE used for programming.
- If all else fails, try a different computer or Operating System.
- Advanced: If you continue to experience persistent
Program Flash Failederrors, you may try adjusting the Radio Poll Time using the Radio Config Utility. Increasing the poll time can sometimes help the Arduino IDE communicate more reliably with the Cyton board during programming. Refer to the Cyton Radios Programming Tutorial for instructions on using the Radio Config Utility to adjust Radio Poll Time. Only attempt this if you are comfortable with advanced configuration steps.
Notes On Updating and Using v2.0.0 Cyton Firmware
Overview
The OpenBCI Cyton boards were updated with new firmware across all three main microcontrollers, the Pic 32 (Pic32) and both RFduinos on the Dongle (Host) and the Board (Device). This tutorial does not explain how to program the firmware using the OpenBCI Dongle and PC; you will want to refer to the tutorials Cyton Board Programming Tutorial and Cyton Radios Programming Tutorial. If you have spent a lot of time writing custom Arduino code to run on the OpenBCI, then you will find this tutorial helpful in upgrading to get the new stability and features of the 2.0.0 firmware.
Sending data packets from the Pic32 to the PC
At 250Hz, we are at the upper limit of the physical hardware. The Device RFduino must send data packets as soon as it gets them from the Pic32 because of the slow serial baud rate between Pic32 and Device (115200 baud, a faster baud rate messes up the radio on the Device). On the other hand, over the air programming must be able to combine multiple radio packets together into one page and write at one time, therefore, over the air programming must wait to see if it received all data over the serial port before sending. These two requirements led to the original firmware being stateful, where the Device and Host would be in either streaming or not streaming mode. This led to problems and could result in the PC not being able to contact the Cyton because the radios were stuck in streaming mode and the reset button on the Cyton is not tied to the Device so one would have to power cycle the entire Cyton.
An Example
Let's say you want to send custom data from the Cyton to the PC. To do that, simply wrap the data with the correct start byte, 0x41, and stop byte, 0xCX (where X is 0-F in hex). In the OpenBCI_32bit_Library code base:
/*
 * @description Writes channel data and axisData array to serial port in
 *  the correct stream packet format.
 *
 *  Adds stop byte OPENBCI_EOP_STND_ACCEL. See OpenBCI_32bit_Library_Definitions.h
 */
void OpenBCI_32bit_Library::sendChannelDataWithAccel(void)  {

    Serial0.write('A'); // 0x41 1 byte

    Serial0.write(sampleCounter); // 1 byte

    ADS_writeChannelData(); // 24 bytes

    accelWriteAxisData(); // 6 bytes

    Serial0.write(OPENBCI_EOP_STND_ACCEL); // 0xC0 1 byte

    sampleCounter++;

}
This code writes 33 bytes of data from the Pic32 to the Device in the correct format. As soon as it arrives at the Device, it will be sent to the Host and to the PC. New to firmware version 2 is the ability to have different stop bytes. In the original firmware, one could only send stop bytes of 0xC0; however, now you can send 0xCn where n is 0-F (hex).
Important: If you want to send only 20 bytes of data per packet, you still must send all 33 bytes with the proper start and stop bytes. Sending data too fast will result in a buffer overflow on the Device and cause the system to restart and send an error message to the Host and PC.
Sending one byte of data every 10ms or 100Hz
Here is an example taken from the file called BoardWithCustomData.ino from the examples folder in the OpenBCI_32bit_Library repo.
void sendLEDStatus() {
  // Must have header byte
  Serial0.write('A'); // 0x41 1 byte
  // Write the LED state
  Serial0.write(LEDState); // 1 byte
  // Fill the rest with fake data
  for (int i = 0; i < 30; i++) {
    Serial0.write(0x00);
  }
  // Send a stop byte with an `B` or `1011` in the last nibble to indicate a
  //  different packet type.
  Serial0.write(0xCB); // 1 byte
}
As you can see above, we only really want to send 1 byte, but if we want to do it quickly, at this 100Hz rate, we must wrap it in the start byte and stop byte to tell the Device to send the packet as soon as it gets the stop byte.
Adopting the new Pic32 code paradigm
We drastically reduced the complexity of the .ino files in order to make custom device programming more approachable for new programmers, but also added a suite of features to give great power to experienced programmers. We have created an environment to drive contribution to the main project in the form of examples. If you want to contribute code to the main library for others to use, now you can simply do a pull request. Joel was able to adapt his pulse sensor code to the new firmware in about 20 minutes! Now anyone who downloads the firmware will get the pulse sensor code, instead of having to dig through all the OpenBCI repos to find an example of how to use a pulse sensor, have external triggers, read an analog input, etc...
Please dig through the examples folder on the OpenBCI_32bit_Library for a deep dive into all the possibilities with the new code. Remember if you have new code you want to share, please do!! Make a pull request!